

AI Configuration
Connect an AI provider so Real Testimonials can summarize your reviews and build testimonial blocks from a plain-words description.
Real Testimonials doesn't come with an AI of its own. Instead, it talks to an AI service you already use (or sign up for): Google Gemini, OpenAI, Anthropic Claude or Groq. You give the plugin an API key, a private access code the provider hands you so other software can use your account, and the AI features switch on.
Those keys live on the AI Configuration tab, and this page walks you through it.
What AI does in Real Testimonials
A connected provider powers two features:
- AI Summary in the Review Summary block. It reads the testimonials the block is showing and writes a short overview of what customers are saying.
- Build with AI in the block editor. You describe the testimonial section you want ("a dark carousel with star ratings, three per row") and it sets up the block for you. Its Refine with AI button changes a block you already have.
You only need one provider, and a single key covers both features. Connect a second one if you'd like a backup (see Primary provider and failover).
The AI never writes your testimonials
Both features work with the testimonials already on your site. The summary describes them, and Build with AI only chooses layout and design settings. Reviews, names and photos always come from your own testimonials.
Opening AI Configuration
- In the WordPress admin, go to Real Testimonials → Settings. (If you're already in the plugin dashboard, click Settings in its navigation.)
- Click AI Configuration in the settings sidebar. It sits between Integrations and Performance.
You can bookmark the tab: its address ends in #settings=ai-configuration. Only administrators can open Settings.
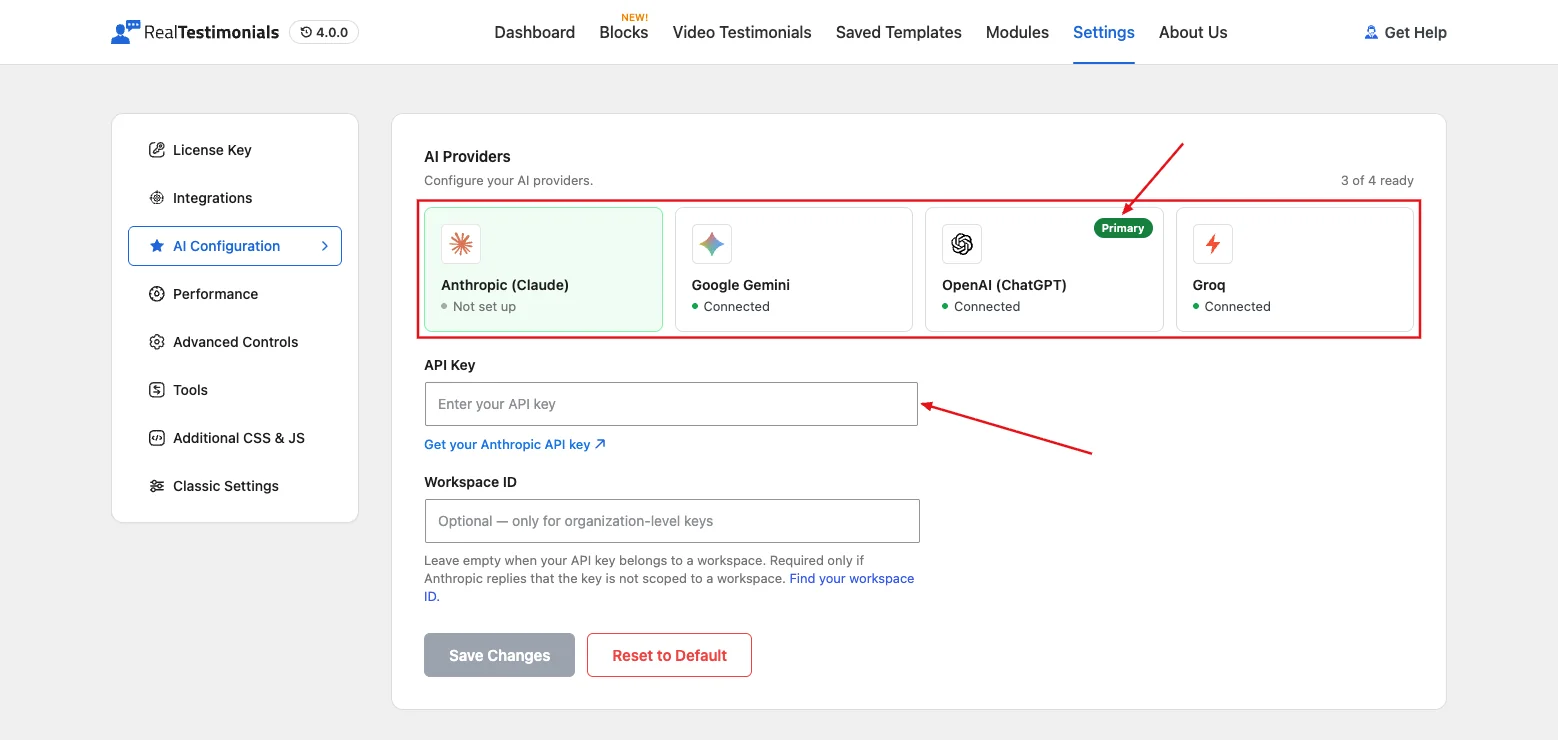
What you'll see
The tab is headed AI Providers. In the top-right corner, a counter such as 1 of 4 ready tells you how many providers are connected.
Below it are four cards: Anthropic (Claude), Google Gemini, OpenAI (ChatGPT) and Groq. Each card shows a status line:
- Connected means the provider has a working key (saved here or in WordPress Connectors).
- Not set up means it doesn't have a key yet.
One connected card also wears a Primary badge. That's the provider the plugin asks first.
Click a card to open its settings form underneath. When you arrive, the tab opens on your Primary provider, or on Anthropic (Claude) if nothing is connected yet.
There's no on/off switch and no tab-wide Save button here. Each provider has its own Save Changes and Reset to Default buttons, and saving a key is what turns a provider on.
Connecting a provider
The steps are the same for every provider. Only the place you get the key differs (see Provider by provider below).
- Click the provider's card.
- Get a key. Click the Get your … API key link under the field. It opens the provider's key page in a new tab. Create a key there and copy it.
- Paste it into API Key. The field says Enter your API key.
- Anthropic only: leave Workspace ID empty unless you know you need it (what it's for).
- Click Save Changes. The button reads Verifying… for a moment while the plugin checks the key (more on that below).
- Reload the block editor if it's already open in another tab. The editor checks which providers are connected when it loads, so a new key isn't picked up until you refresh.
When it works, you'll see API key verified and saved., the card switches to Connected, and the key locks into place.
The first provider you save becomes Primary
You don't have to choose a Primary yourself. Whichever provider you connect first gets the Primary badge, and you can change it later with Make primary.
Your key is checked before it's saved
When you click Save Changes, the plugin sends the provider one tiny test request (it asks for the word "OK") using your key. This catches a mistyped key, missing billing or a used-up quota now, instead of later on a live page.
If the provider says no, nothing is saved. The reason appears in red under the field, starting with the provider and model, for example OpenAI (gpt-5.6-luna): Incorrect API key provided…. The rest of the message is the provider's own explanation. Fix the problem and click Save Changes again.
The test request is tiny, but it's still a real request to the provider, so it may show up on your usage page.
Provider by provider
Every provider works for both features, so pick whichever you already have an account with. If you're starting from scratch, Google Gemini is the easiest place to begin, because Google offers a free tier (check Google AI Studio for current limits).
| Provider | Get a key at | Models offered |
|---|---|---|
| Google Gemini | aistudio.google.com/app/api-keys | Gemini 3.1 Flash-Lite Preview (Recommended), Gemini 3.1 Flash-Lite |
| OpenAI | platform.openai.com/api-keys | GPT-5.6 Sol, GPT-5.6 Terra, GPT-5.6 Luna (Recommended) |
| Anthropic Claude | console.anthropic.com/settings/keys | Claude Haiku 4.5 (Recommended), Claude Sonnet 5, Claude Opus 5 |
| Groq | console.groq.com/keys | GPT-OSS 120B (Recommended), GPT-OSS 20B, Qwen3.8 27B |
You don't pick the model on this tab. See Choosing a model for where that happens.
Google Gemini
- Visit aistudio.google.com/app/api-keys and sign in with your Google account.
- Click Create API Key and copy it. Gemini keys start with
AIza. - Paste it into the Google Gemini card's API Key field and click Save Changes.
Models: both are Flash-Lite models. They're fast, inexpensive and more than capable of summarizing reviews. Gemini 3.1 Flash-Lite Preview is the recommended one and tracks Google's newest build. Gemini 3.1 Flash-Lite is the settled version. If a summary ever stops working after a change on Google's side, try switching between the two.
OpenAI
- Visit platform.openai.com/api-keys and sign in, or create an OpenAI account.
- Click Create new secret key and copy it. OpenAI only shows it once.
- Paste it into the OpenAI (ChatGPT) card and click Save Changes.
You'll need billing set up on your OpenAI account. A ChatGPT subscription doesn't cover API use.
Models:
- GPT-5.6 Luna is the recommended one and the lightest. It's good enough for review summaries on most sites.
- GPT-5.6 Terra is a middle option when you want more careful wording.
- GPT-5.6 Sol is the most capable and the most expensive.
Anthropic Claude
- Visit console.anthropic.com/settings/keys and sign in, or create an Anthropic account.
- Create a new key and copy it.
- Paste it into the Anthropic (Claude) card. Leave Workspace ID empty for now.
- Click Save Changes.
About the Workspace ID: most keys don't need it. It's only required when your key belongs to a whole organization rather than a single workspace. If that's the case, the check after Save Changes fails with a message saying the key isn't scoped to a workspace. Find your workspace ID at console.anthropic.com/settings/workspaces (the Find your workspace ID. link under the field goes there), paste it in, and save again. If your key already belongs to a workspace, keep the field empty, because a workspace key rejects it.
Models:
- Claude Haiku 4.5 is the recommended one: the fastest and cheapest. Summarizing reviews is a straightforward job, so start here.
- Claude Sonnet 5 is a step up in nuance, for sites where the wording really matters.
- Claude Opus 5 is the most capable and the most expensive. It's rarely necessary for review summaries.
Groq
- Visit console.groq.com/keys and sign in, or create a Groq account.
- Create an API key and copy it.
- Paste it into the Groq card and click Save Changes.
Groq runs open models on its own fast hardware. GPT-OSS 120B is the recommended one, GPT-OSS 20B is a lighter version of it, and Qwen3.8 27B is an alternative from a different model family.
Groq isn't available through WordPress Connectors, so its key always goes here.
Choosing a model
The AI Configuration tab only stores keys. You pick the model where you use the AI:
- Review Summary block: the AI Model dropdown under AI Provider in the block's AI Summary panel. See AI Summary.
- Build with AI: the model dropdown next to the provider at the bottom of the Build with AI window.
Both lists mark the recommended model with (Recommended), and that's what runs until you choose something else. If you picked a different model in an earlier version of the plugin, that choice is kept. Reset to Default sets it back to the recommended one.
Not sure which to choose? Stick with the recommended model. Summaries and block settings are short, simple jobs, so a bigger model mostly just costs more.
Primary provider and failover
If you connect more than one provider, the extra ones act as backups. The Primary is always asked first.
The plugin tries providers in this order:
- The provider a block asks for, if you picked one in the Review Summary block or the Build with AI window.
- Your Primary provider.
- Every other connected provider, in a fixed order: Google Gemini, OpenAI, Anthropic Claude, then Groq.
To change the Primary, open another connected provider's card and click Make primary. You'll see a message such as Anthropic is now the primary provider.
When only one provider is connected, the tab nudges you: Add a backup provider so building keeps working if … reaches its limit. A backup is optional, but it's handy if you ever hit a provider's usage limit.
What a backup does depends on the feature:
- AI Summary switches automatically. If the provider fails (quota used up, a rejected key, an outage or an empty reply), the plugin quietly tries the next connected provider. Visitors never see the hiccup. The summary is saved under whichever provider answered.
- Build with AI asks you first. It never switches providers on its own. If your provider fails and another one is connected, the window offers a Continue button to send the same prompt to the next provider. See If something goes wrong.
A failing Primary is still tried first every time
The plugin doesn't sideline a provider that just failed. If your Primary keeps running out of quota, fix the account or click Make primary on another provider.
Managing a saved key
Once a key is saved, the field locks and shows a masked version: the first and last few characters with dots in between, plus a Connected pill. The full key is never sent back to your browser, not even to administrators, so nobody can copy it off the screen.
Under the field you'll find:
- Replace key swaps in an empty field so you can paste a new key. Cancel brings the saved one back. Clicking Save Changes checks the new key before saving it.
- Remove key deletes the saved key after you confirm Remove the saved … API key? You'll see API key removed.
- Make primary appears on any connected provider that isn't the Primary yet.
Reset to Default (next to Save Changes) asks Are you sure you want to reset?, then clears the key, sets the model back to the recommended one and, for Anthropic, empties the Workspace ID.
If you remove the Primary's key, the next connected provider becomes Primary on its own.
Using WordPress Connectors
WordPress 7.0 added a Settings → Connectors screen, a single place to store AI keys that any plugin on your site can use. If you've already set up Google, OpenAI or Anthropic there, Real Testimonials uses that connection and you don't have to enter the same key twice.
When a Connector serves a provider, that provider's form changes:
- The key field is replaced by a ✓ Connected via WordPress panel.
- If there's no key saved in Real Testimonials, the panel reads This provider is already configured in WordPress Connectors, so there is no key to enter here.
- If you'd saved a key here before, it reads Real Testimonials Pro uses that connection. The key saved here stays as a fallback for when the connection is unavailable. Click Remove the key stored here if you don't want that fallback.
- Manage in WordPress Connectors opens the Connectors screen, and Make primary works as usual.
The Connector always wins over a key saved here. To disconnect a Connector-served provider, remove its key on the WordPress Connectors screen.
If a provider is available in Connectors but has no key there yet, its form shows a short note: Already use this provider elsewhere on your site? Add its key once under WordPress Settings → Connectors instead of here. You can follow the link or click × to dismiss it. Dismissing it once hides the note on every provider for good.
A few last points:
- Groq has no Connector, so its key always lives on this tab.
- On WordPress older than 7.0, there's no Connectors screen. Just save your keys here.
- If AI is switched off for your whole site in WordPress, Build with AI isn't available, and Connectors aren't used.
When you remove a provider
There's no on/off toggle on this tab. To stop using a provider, click Remove key (or Reset to Default). Here's what happens next:
- The card shows Not set up, and the provider disappears from the Review Summary block's AI Provider list and from the Build with AI window (reload the editor to see the change).
- A Review Summary block that was set to that provider moves on to your Primary, or the next connected provider. That provider writes a fresh summary the next time the block is viewed, and its account is billed for it.
- If no provider is left, AI summaries stop appearing. Visitors see nothing in that spot, and administrators see an AI summary unavailable note explaining why. The Build with AI window asks you to connect a provider.
- Blocks you built with AI stay exactly as they are. They're ordinary blocks.
- Billing stops for that provider, because no more requests are sent to it.
Upgrading from an older version?
Earlier versions kept AI keys on the Integrations tab, with an on/off toggle per provider. Your saved keys carried over. If you'd switched a provider off there, its form now says This provider is switched off. Save to turn it back on. Click Save Changes to use it again.
Costs and what gets sent
You pay the provider, not us
Each AI service charges for the text it generates, under its own pricing. Check the provider's current rates before you use an expensive model on a busy site.
- Summaries are cached for 12 hours, so a busy page doesn't mean one request per visitor. A new summary is written when the cache runs out, or when you change the block's provider, model, Display Limit or which testimonials it shows.
- Build with AI isn't cached. Every Build Testimonial Showcase or Update Showcase click is one billed request.
- For a summary, the provider receives the star rating and text of each testimonial in the block (up to 200). Reviewer names and photos aren't sent.
- For Build with AI, the provider receives your prompt and, when you're refining, the block's current settings.
- Your keys stay on your server. The editor only learns which providers are connected, never the keys themselves.
Related pages
- Review Summary → AI Summary: add an AI-written summary to your reviews.
- Build with AI: build and refine testimonial blocks by describing them.
- Integrations: connect page builders like Elementor and Divi.
- Settings: every other plugin-wide option.
- Hooks: developer filters for the summary cache, request timeout and more.