

Add New Testimonial
Create a single testimonial the classic way — the person, their quote, rating, photo and details that every View and block pulls from.
Before you can display anything, you need testimonials to show. A testimonial is one review: who said it, what they said, their rating, and details like a photo or company. This page walks through adding one from the WordPress admin, field by field.
You only build a testimonial once. After that, both the classic Views and the display blocks read from the same testimonials — so the reviewer you add here is available everywhere.
Open the editor
- In the WordPress admin sidebar, go to Real Testimonials → All Testimonials.
- Click Add New.
The edit screen opens with a title field, the testimonial content area, and a Reviewer Information box for everything else.
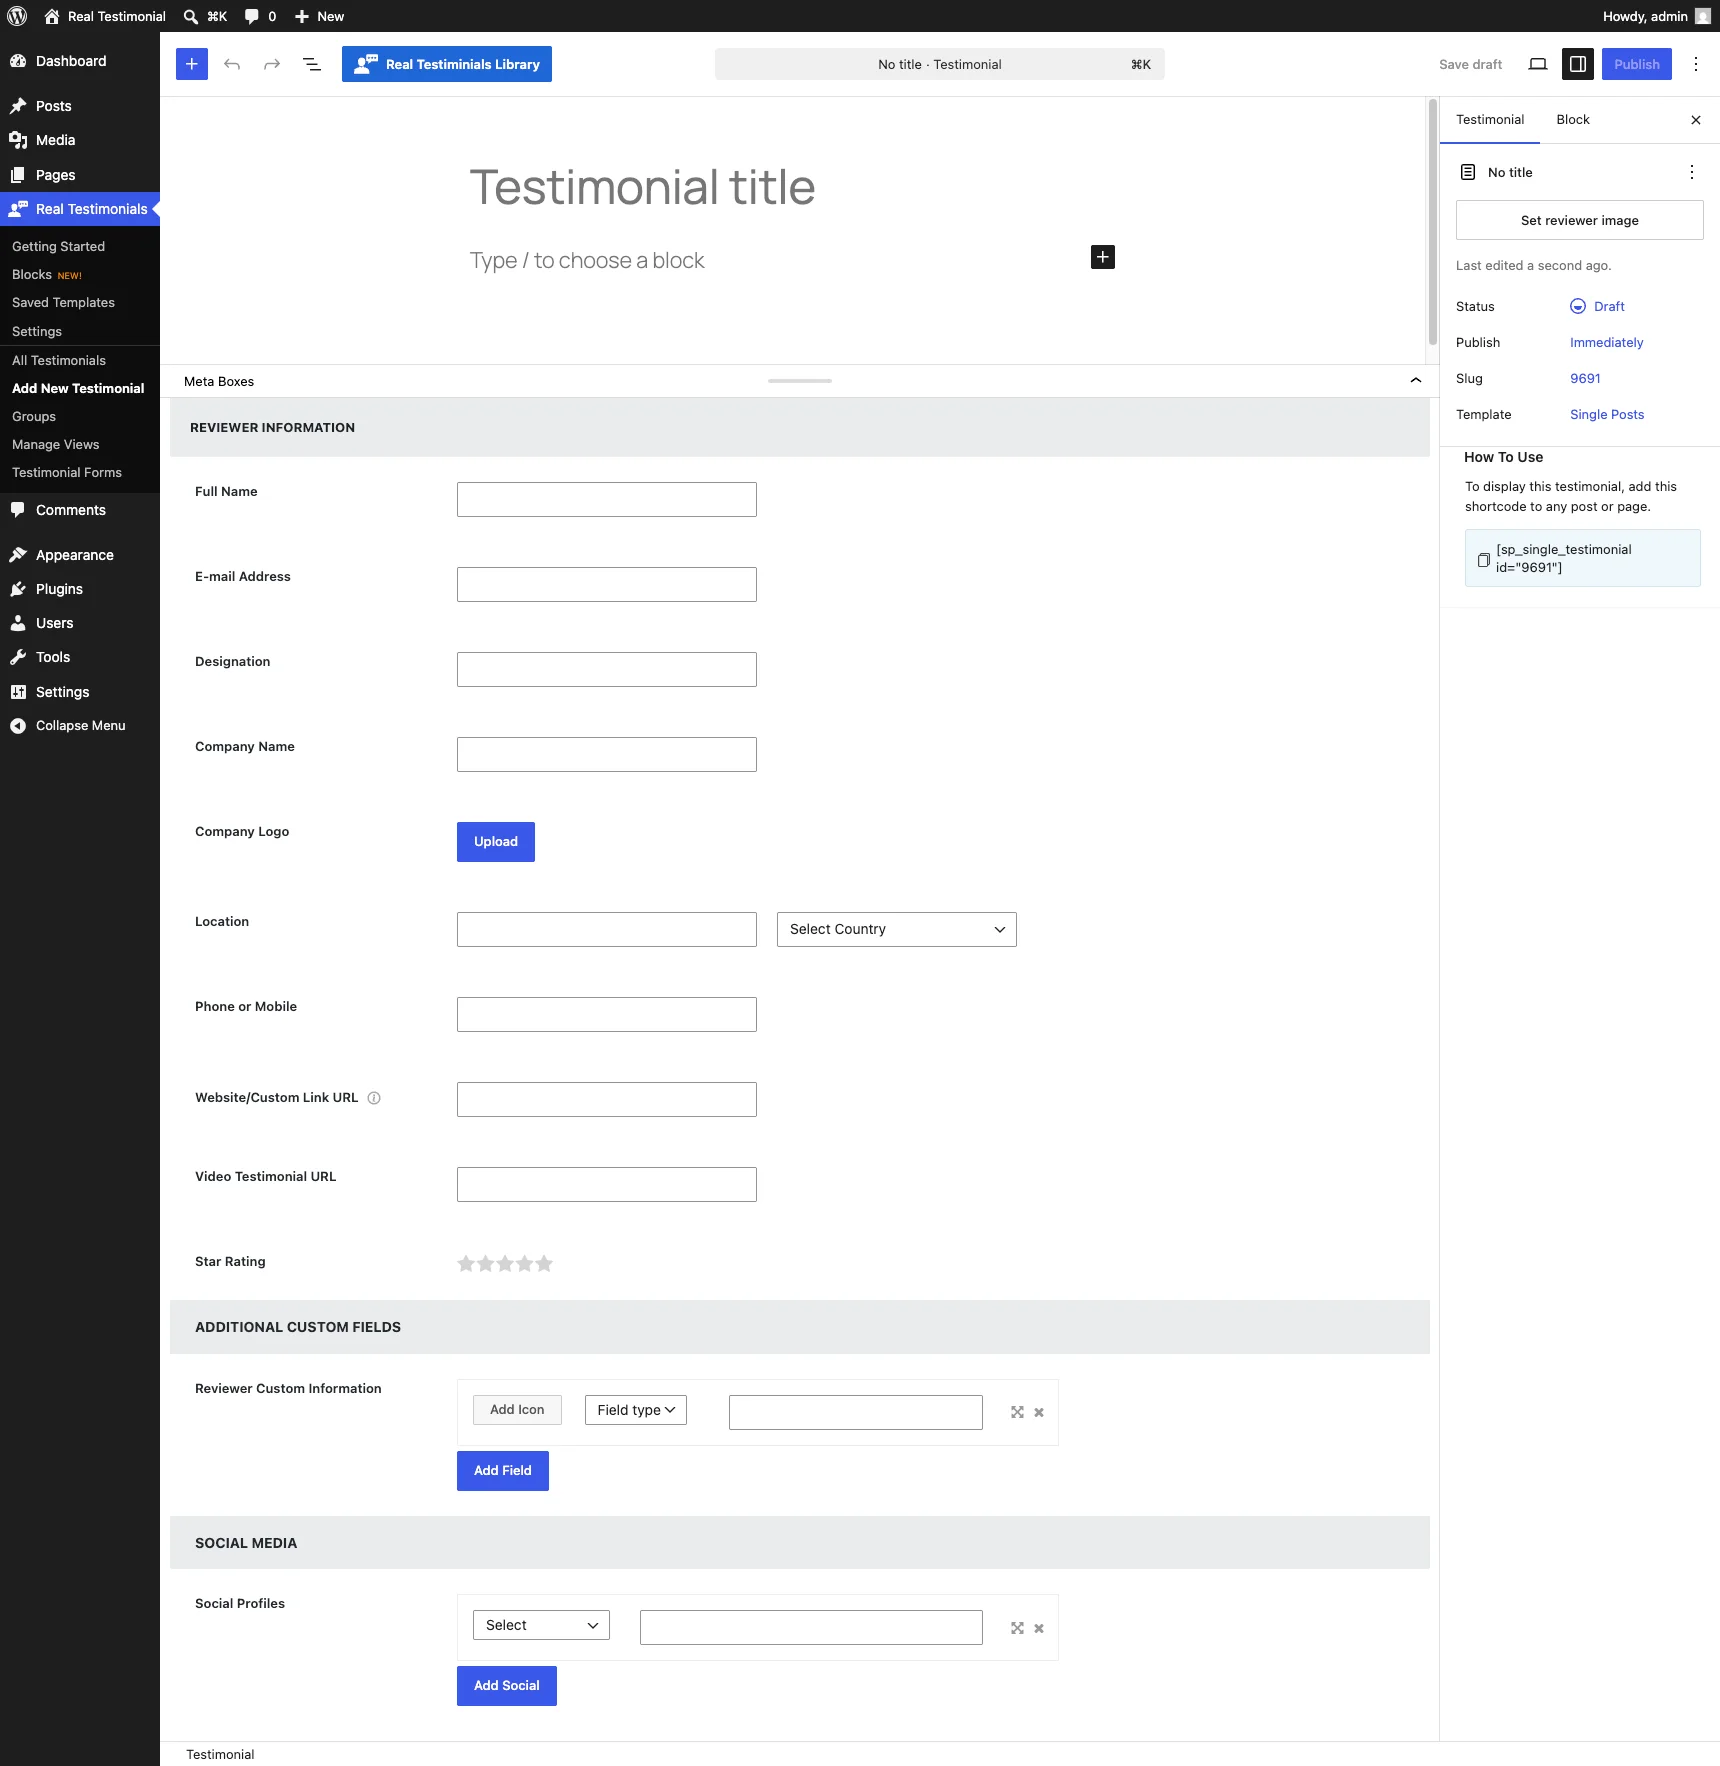
The basics: title, quote and photo
These three use standard WordPress features, so if you've ever written a post, you already know them:
| Field | What it's for |
|---|---|
| Title | A short headline for the testimonial — often the pull-quote, like "Support was outstanding". Keep it punchy; the full quote goes in the content editor. Some card designs show the title, and it's also how you find the testimonial in your admin list. |
| Testimonial content | The testimonial text itself, written in the main editor. This is what appears as the quote on your cards. Blocks can trim it to a set length and add a Read More link — that's a display setting on the block, not something you set here. |
| Reviewer image | The Featured Image panel in the sidebar (labeled Set reviewer image). Upload the reviewer's photo here. If a testimonial has no photo, blocks fall back to a default avatar you can configure per block. Always try to set one — cards look far stronger with a face. |
Reviewer Information fields
The Testimonial Options box under the editor holds the reviewer's details. Every field here is optional — fill in what you have, and decide per block which ones show via the Card Content panel.
Full Name
The person giving the testimonial, e.g. Jane Doe. Shown on the card as the reviewer name — usually the most prominent detail after the quote.
E-mail Address
The reviewer's email. It's stored for your reference (handy when a review arrives through the Submission Form and you want to follow up) — it is not shown on the front end (the public side of your site that visitors see).
Designation
The reviewer's job title or role, e.g. Marketing Manager. Typically shown right under the name. If you've filled in a Website/Custom Link URL (below), the designation becomes a link to it.
Company Name
The company the reviewer works for or represents. Like the designation, it links to the Website/Custom Link URL when one is set.
Company Logo
An image upload for the company's logo. Some card designs feature the logo prominently — a wall of recognizable logos adds real credibility. Upload a reasonably small, transparent-background image for the cleanest result.
Location
Two inputs side by side:
- Location — a free-text field for the city or region, e.g. Austin, TX.
- Country — a dropdown of countries, each with its flag. On the card, the Reviewer Details panel lets you show the country as a flag, the name, or both.
Phone or Mobile
The reviewer's phone number, stored for your reference like the email address.
Website/Custom Link URL
A single URL that the Designation and Company Name link to on the front end. Point it at the reviewer's company site, portfolio, or the original review — anywhere a curious visitor should land when they click.
Video Testimonial URL
Turn the testimonial into a video review by pasting a video URL. Three kinds work:
- YouTube — any standard YouTube link.
- Vimeo — any Vimeo link.
- Self-hosted video — a direct link to a video file (like
.mp4or.webm), including files from your own Media Library.
When a video URL is set, the card shows a play button over the reviewer image and plays the video in place. Visitors can also record or upload a video themselves through the Submission Form — it lands in this field automatically.
Star Rating
The review score, from 1 Star to 5 Stars (whole stars only). Leaving it unset is fine — cards show no stars for that testimonial. The rating also powers three things elsewhere in the plugin:
- The Query Builder's Based on Star Rating filter (e.g. show only 4-stars-and-up).
- The Review Summary child block's average rating.
- The Filter by Rating front-end control.
The date
There's no separate date field — a testimonial's date is its WordPress publish date. Want a review dated last March? Edit the publish date in the sidebar's summary panel. How the date appears (the format, or a relative "2 weeks ago" style) is a display choice you make per block in the Reviewer Details panel.
Groups
Groups are the plugin's taxonomy — WordPress's term for a way of categorizing content, like post categories — for sorting testimonials into sets such as Product, Support, or Enterprise. They're hierarchical, so a group can have sub-groups.
- Manage them under Real Testimonials → Groups, or create them right from the Groups panel on the edit screen.
- A testimonial can belong to any number of groups.
- Use groups in the Query Builder (Filter Testimonials → Groups) to control what a block shows, and in Filter by Group to let visitors filter live.
Use groups consistently — front-end filters are only as meaningful as your grouping.
Social Profiles module
Add links to the reviewer's social accounts, shown as icons on the card (styled in the block's Social Media panel). This section appears on the edit screen only when the Reviewer Social Profiles module is enabled.
Click Add Social, pick a network from the dropdown, and paste the profile URL. Repeat for as many profiles as you like. The list covers 36 networks — from Facebook, X (Twitter), LinkedIn, Instagram, YouTube, WhatsApp and Yelp to developer favorites like GitHub, Stack Overflow, Dribbble and Behance.
Additional Custom Fields module
When the built-in fields aren't enough — say you want to show Years as customer or Project budget — add your own. This section appears only when the Custom Information Fields module is enabled.
Click Add Field to create a row, then set three things per field:
| Part | What it does |
|---|---|
| Icon | An optional icon shown next to the value on the card. |
| Field type | Text, Number, Email, Link or Date — controls how the value is treated (a Link shows as a clickable URL, for example). |
| Value | The actual content, e.g. "Customer since 2019". |
Rows can be reordered by dragging, and each testimonial can have its own set — custom fields are defined per testimonial, not globally.
Disabling a module never deletes data
If you turn off Social Profiles or Custom Information Fields, the saved values stay on each testimonial — they stop showing. Re-enable the module and they reappear.
Choosing what actually shows
Filling in a field doesn't force it onto every card. Each display block has a Card Content panel where you toggle the name, designation, company, location, date, rating and the rest on or off — and the six card designs each arrange them differently. So enter everything you have; you stay in control of what shows, per block.
You don't have to type it all yourself
There's a way to fill your library without manual entry: publish the Submission Form block and let customers submit text, photo and video reviews — each arrives as a testimonial with these same fields filled in.