

Testimonial Forms
Build a front-end submission form the classic way, then place it with a shortcode so visitors can send you their own testimonials.
A Testimonial Form is a form your visitors fill in to submit a testimonial themselves — their name, quote, rating, maybe a photo or even a recorded video. You build the form once in the admin, place it with a shortcode, and every submission lands in your All Testimonials list as pending, waiting for your approval before it shows anywhere.
This is the classic counterpart to the block-based Submission Form. Both collect testimonials into the same list — this one is built in the admin and placed with a shortcode, which suits the Classic Editor and page builders.
The defaults give you a working form out of the box, so the quick path below takes about a minute. When you want to change a label, a color, or what happens after someone submits, the Form Options tabs further down cover every setting.
Create a form
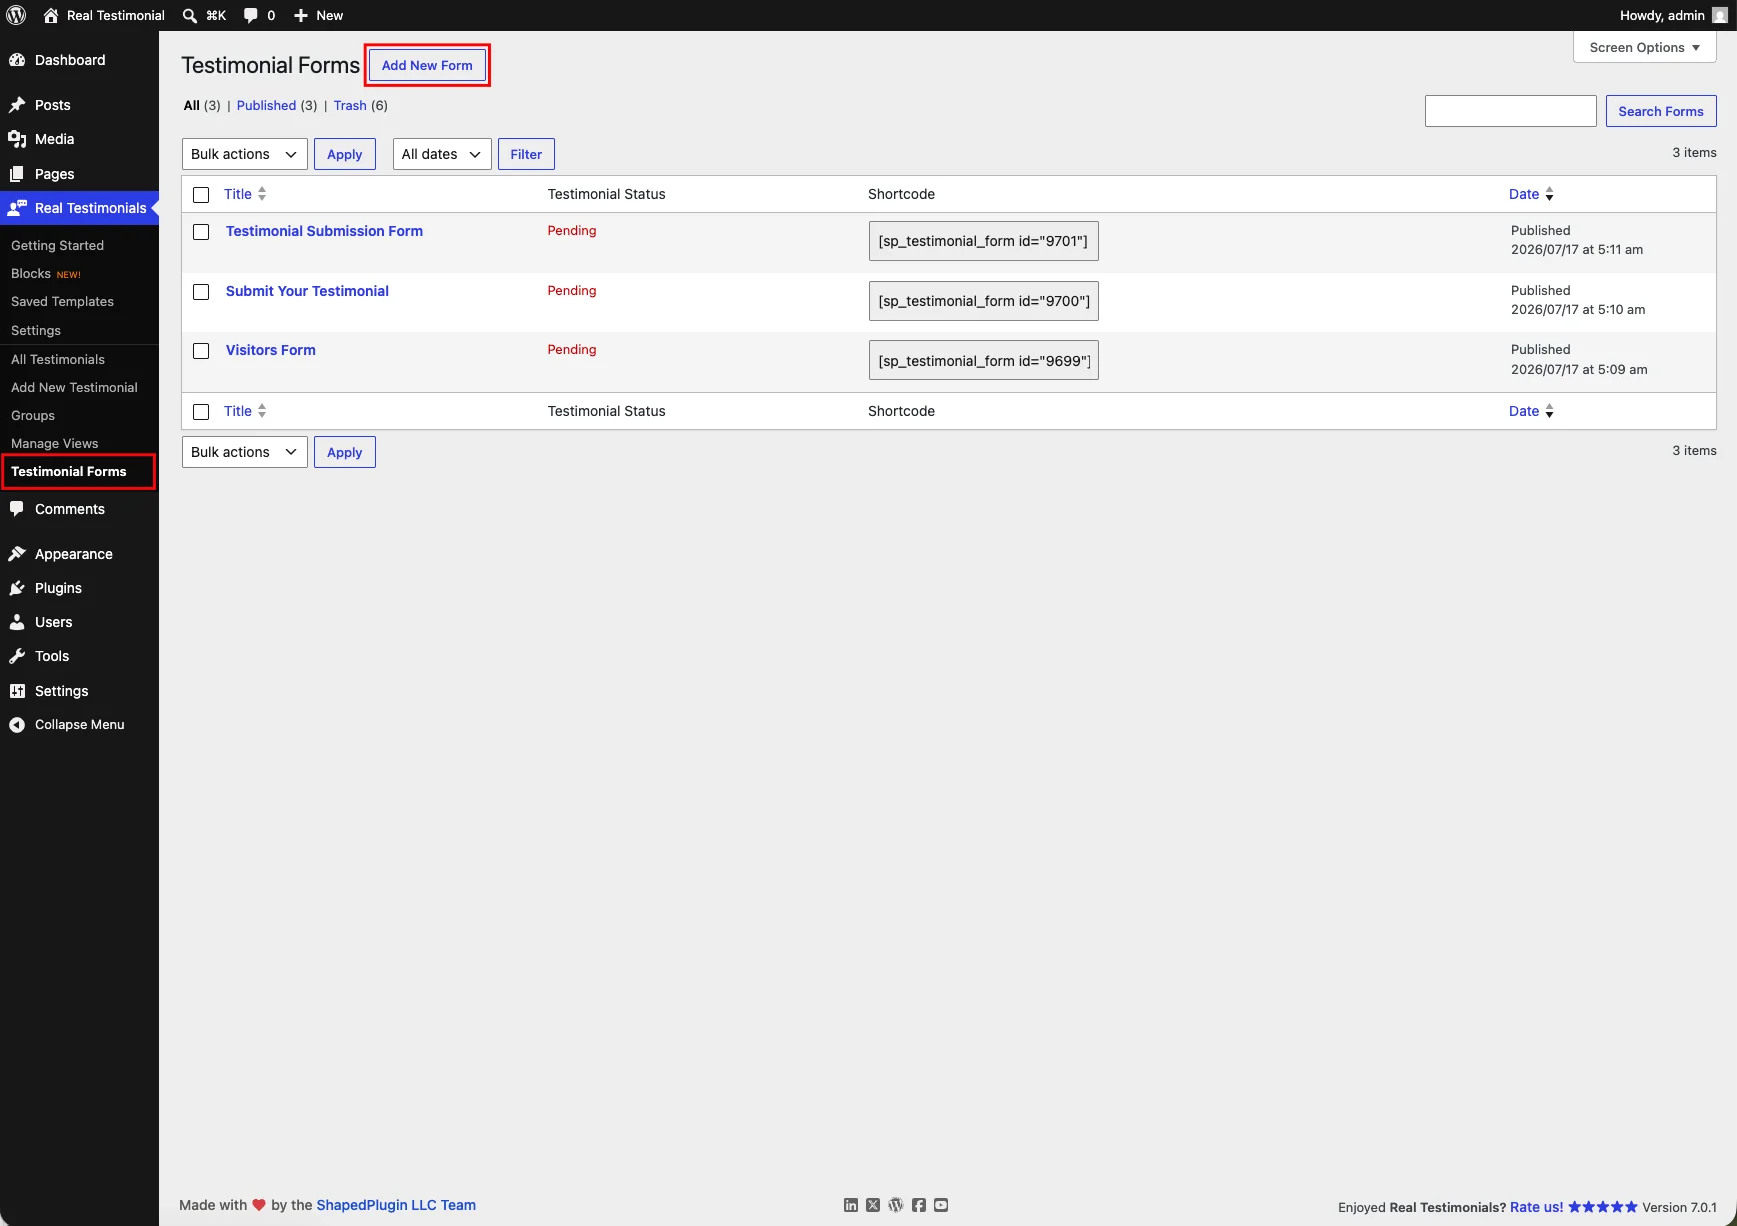
- In the WordPress admin, go to Real Testimonials → Testimonial Forms.
- Click Add New.
- Give the form a title (for your reference, like Customer Review Form).
- In the Testimonial Form Fields box on the side, check the fields you want the form to collect.
- Fine-tune everything in the Form Options box — its four tabs (Form Editor, Labels & Messages, Status & Notifications, and Form Styles) are covered below.
- Click Publish.
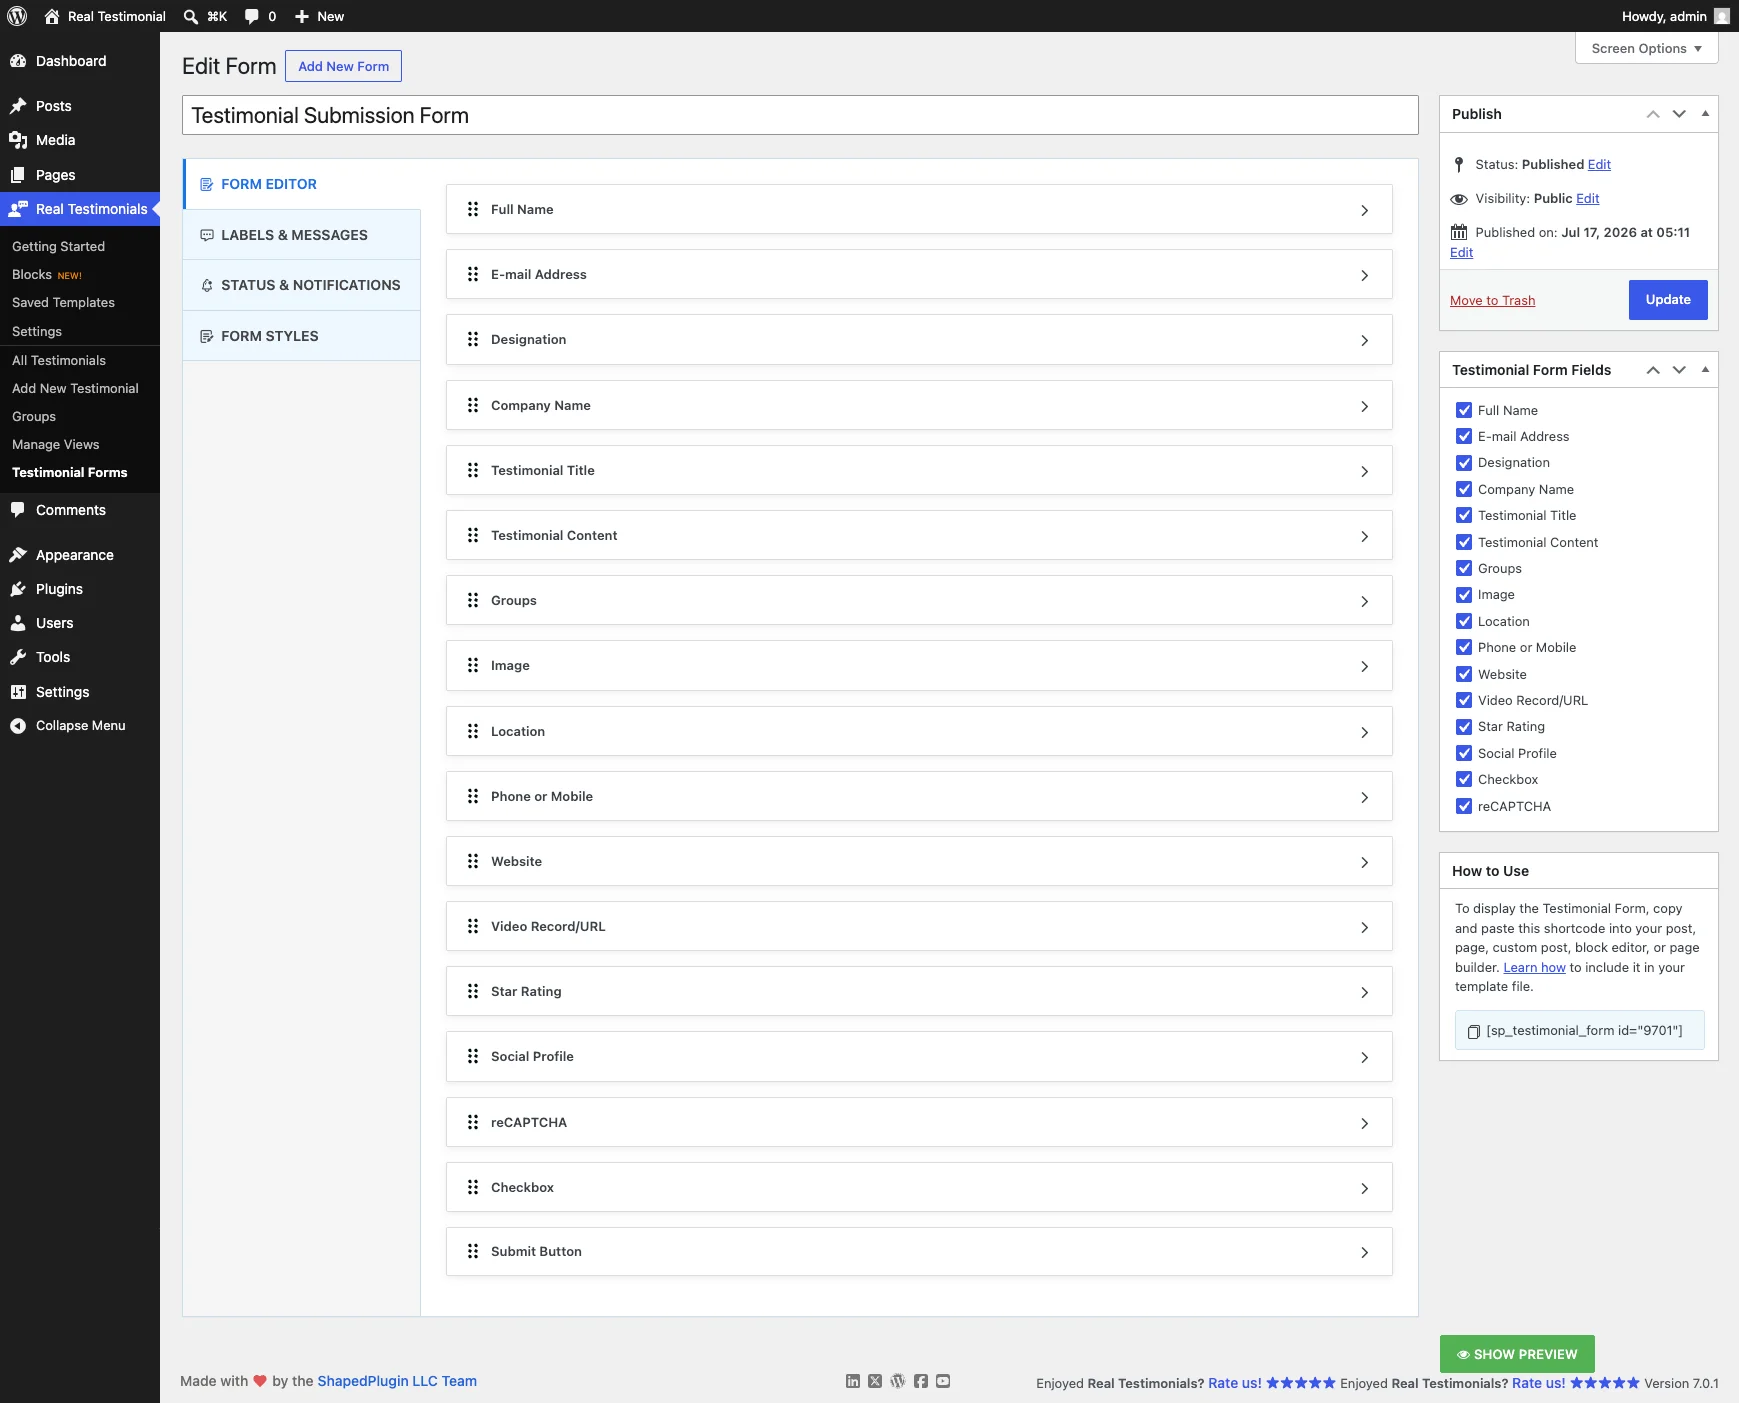
A Live Preview box shows the form as you build it — click Show Preview (then Update Preview after changes) to see exactly what visitors will get.
Form Options — the tabs
Form Editor
This is where you configure the fields you checked in the Testimonial Form Fields box. Each checked field gets its own little panel here — drag the panels to reorder the form.
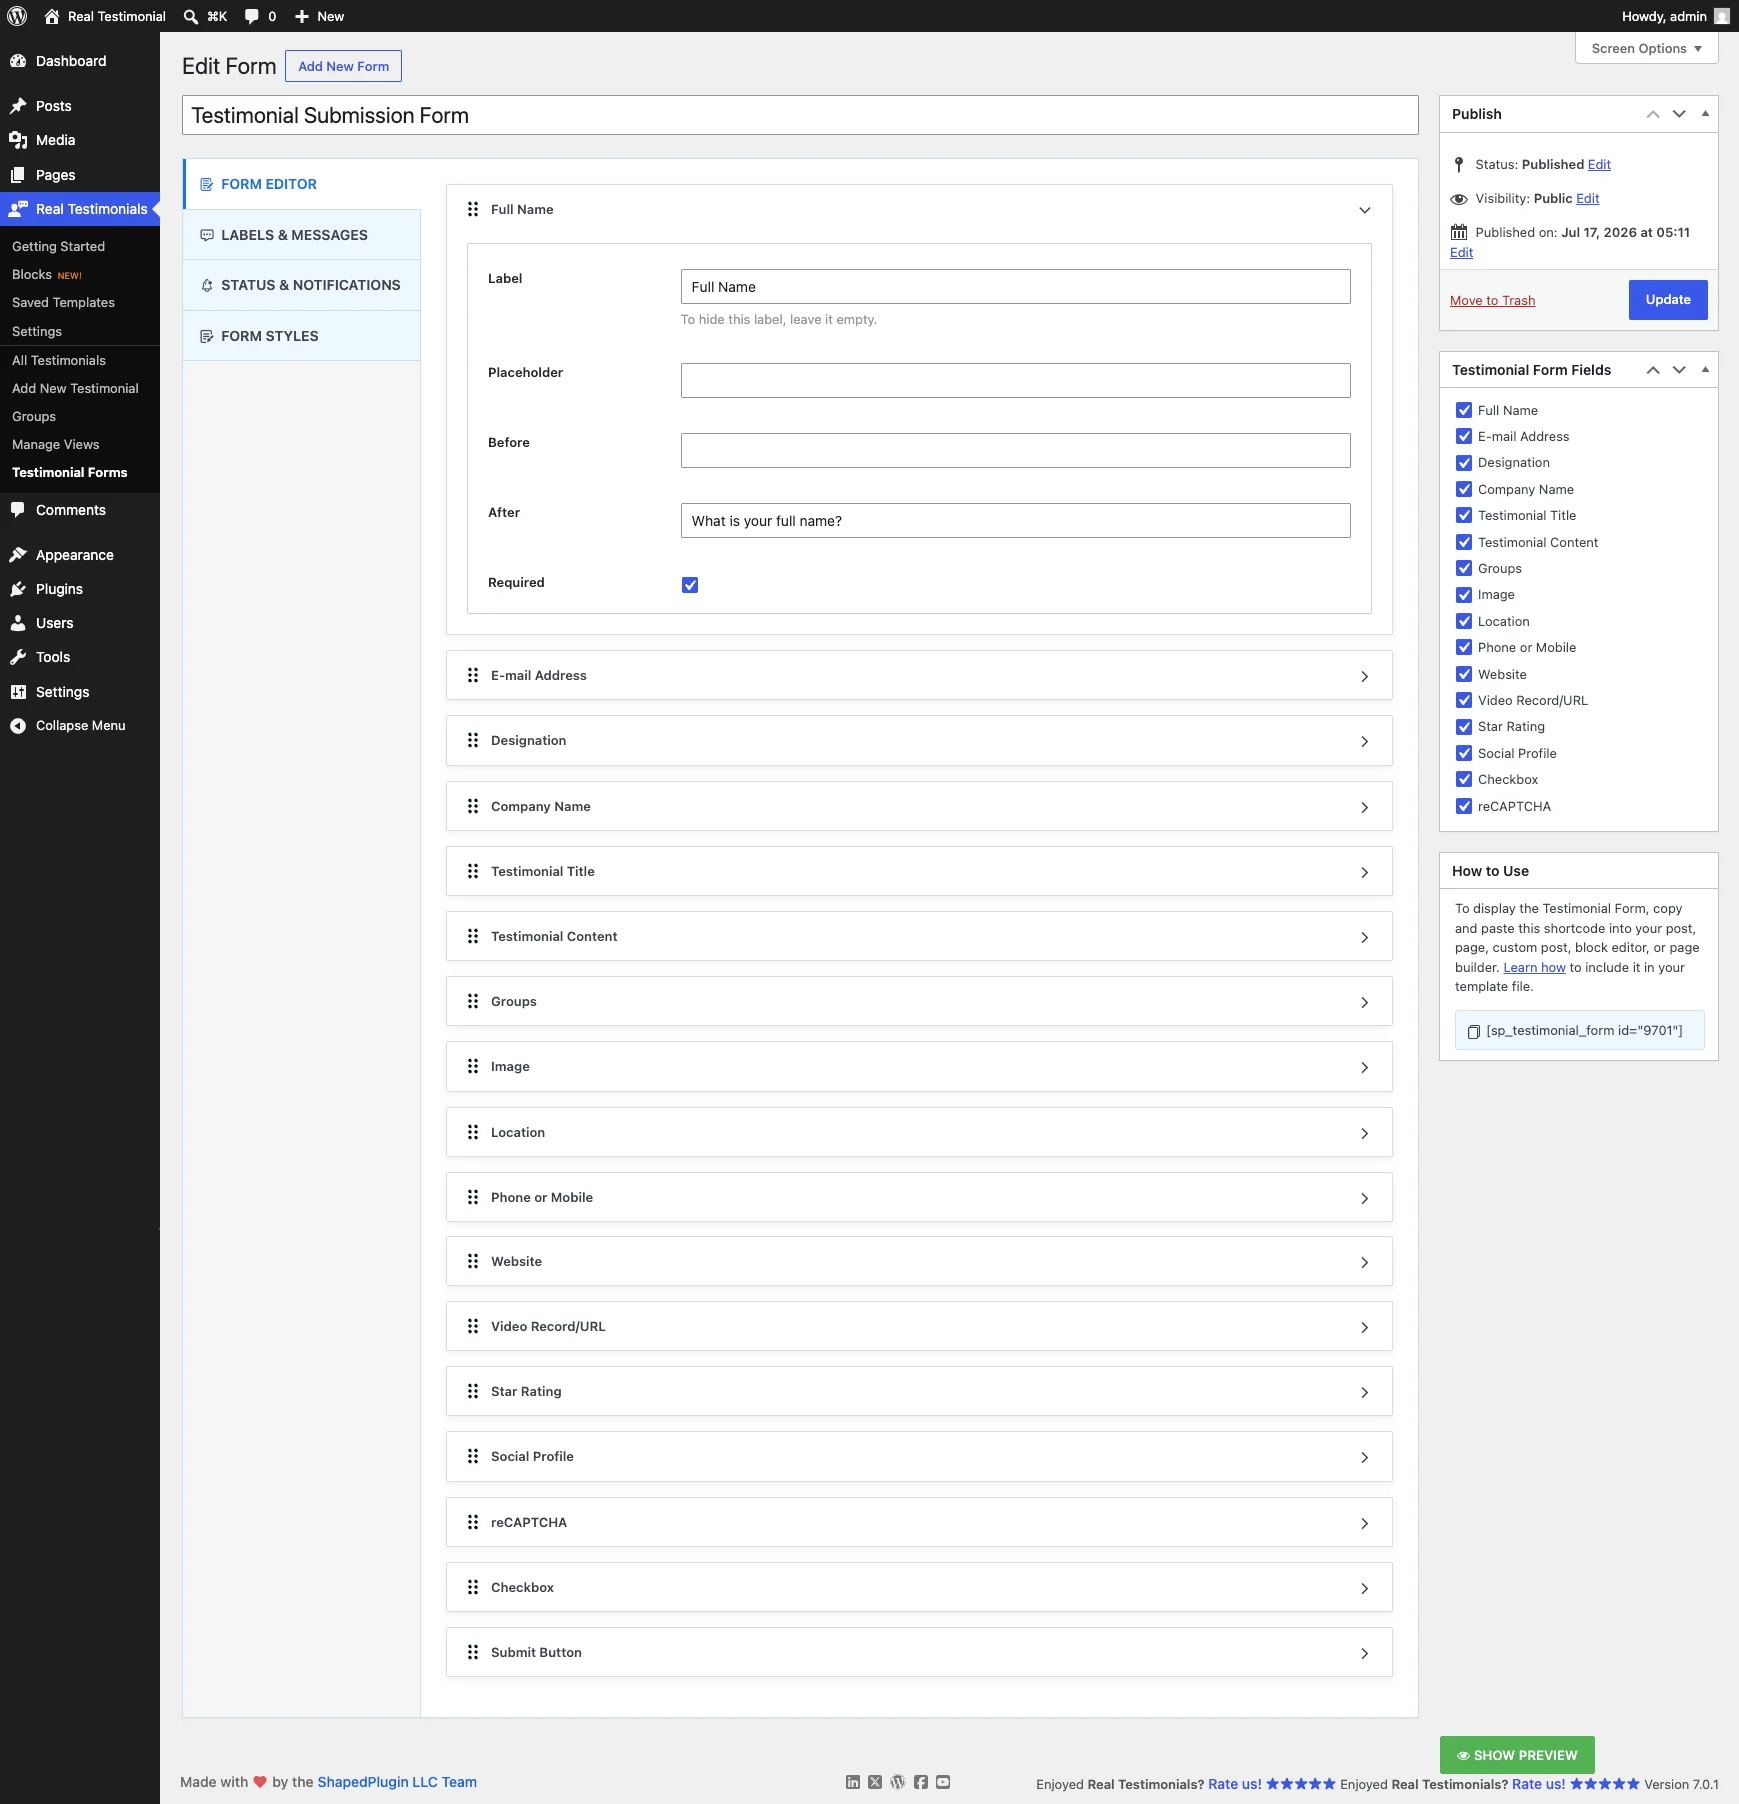
Most fields share the same options, so here's the pattern once:
- Label — the field's heading. Change it to whatever you like, or leave it empty to hide the label.
- Placeholder — the faint hint text inside the field, which disappears as the visitor types.
- Before / After — short helper text shown before or after the field (most fields come with a friendly default, like "What is your full name?").
- Required — check this to make the field mandatory; the form won't submit until it's filled in.
The available fields, and anything special about each:
- Full Name — required by default.
- E-mail Address — required by default.
- Designation — the reviewer's role or job title.
- Company Name
- Testimonial Title — a headline for the review, with a Maximum Length limit (default: 50 characters, or count by words).
- Testimonial Content — the review message itself; required by default, with a Maximum Length limit (default: 500 characters).
- Groups — lets reviewers file their testimonial under a Group (category). Adds Multiple Group Selection? (allow picking more than one) and Select Group(s) (which groups reviewers see — leave blank for all). If you select just one group, the field hides on the front end and submissions go straight into that group.
- Image — a reviewer photo upload. Default label: Photo.
- Location — with an optional Country Selector dropdown.
- Phone or Mobile
- Website
- Video Record/URL — collect a video testimonial. Choose a Video Type:
- Record Video (default) — reviewers record themselves right in the browser. You set the heading label (default: "Leave A Video Review"), the record button text (default: "Record video"), the Preferred Video Format (Webm (default) or MP4), and a Maximum Recording Time (default: 2 minutes, up to 5).
- Video by URL — a plain text field where reviewers paste a link to their video.
- Star Rating — with an optional Preselect Star Rating so the stars start pre-filled (e.g. at 5).
- Social Profile — lets reviewers add links to their social accounts. Select Social Profile(s) picks which networks are offered (leave blank to show all).
- Checkbox — a consent checkbox; default label: "I agree to publish the testimonial on the website.", required by default.
- reCAPTCHA — spam protection. Just a label here; the keys are set up in the plugin settings (see Spam protection below).
- Submit Button — the button text. Default: SUBMIT TESTIMONIAL.
Labels & Messages
Controls the small print around the form and what happens after a visitor submits it.
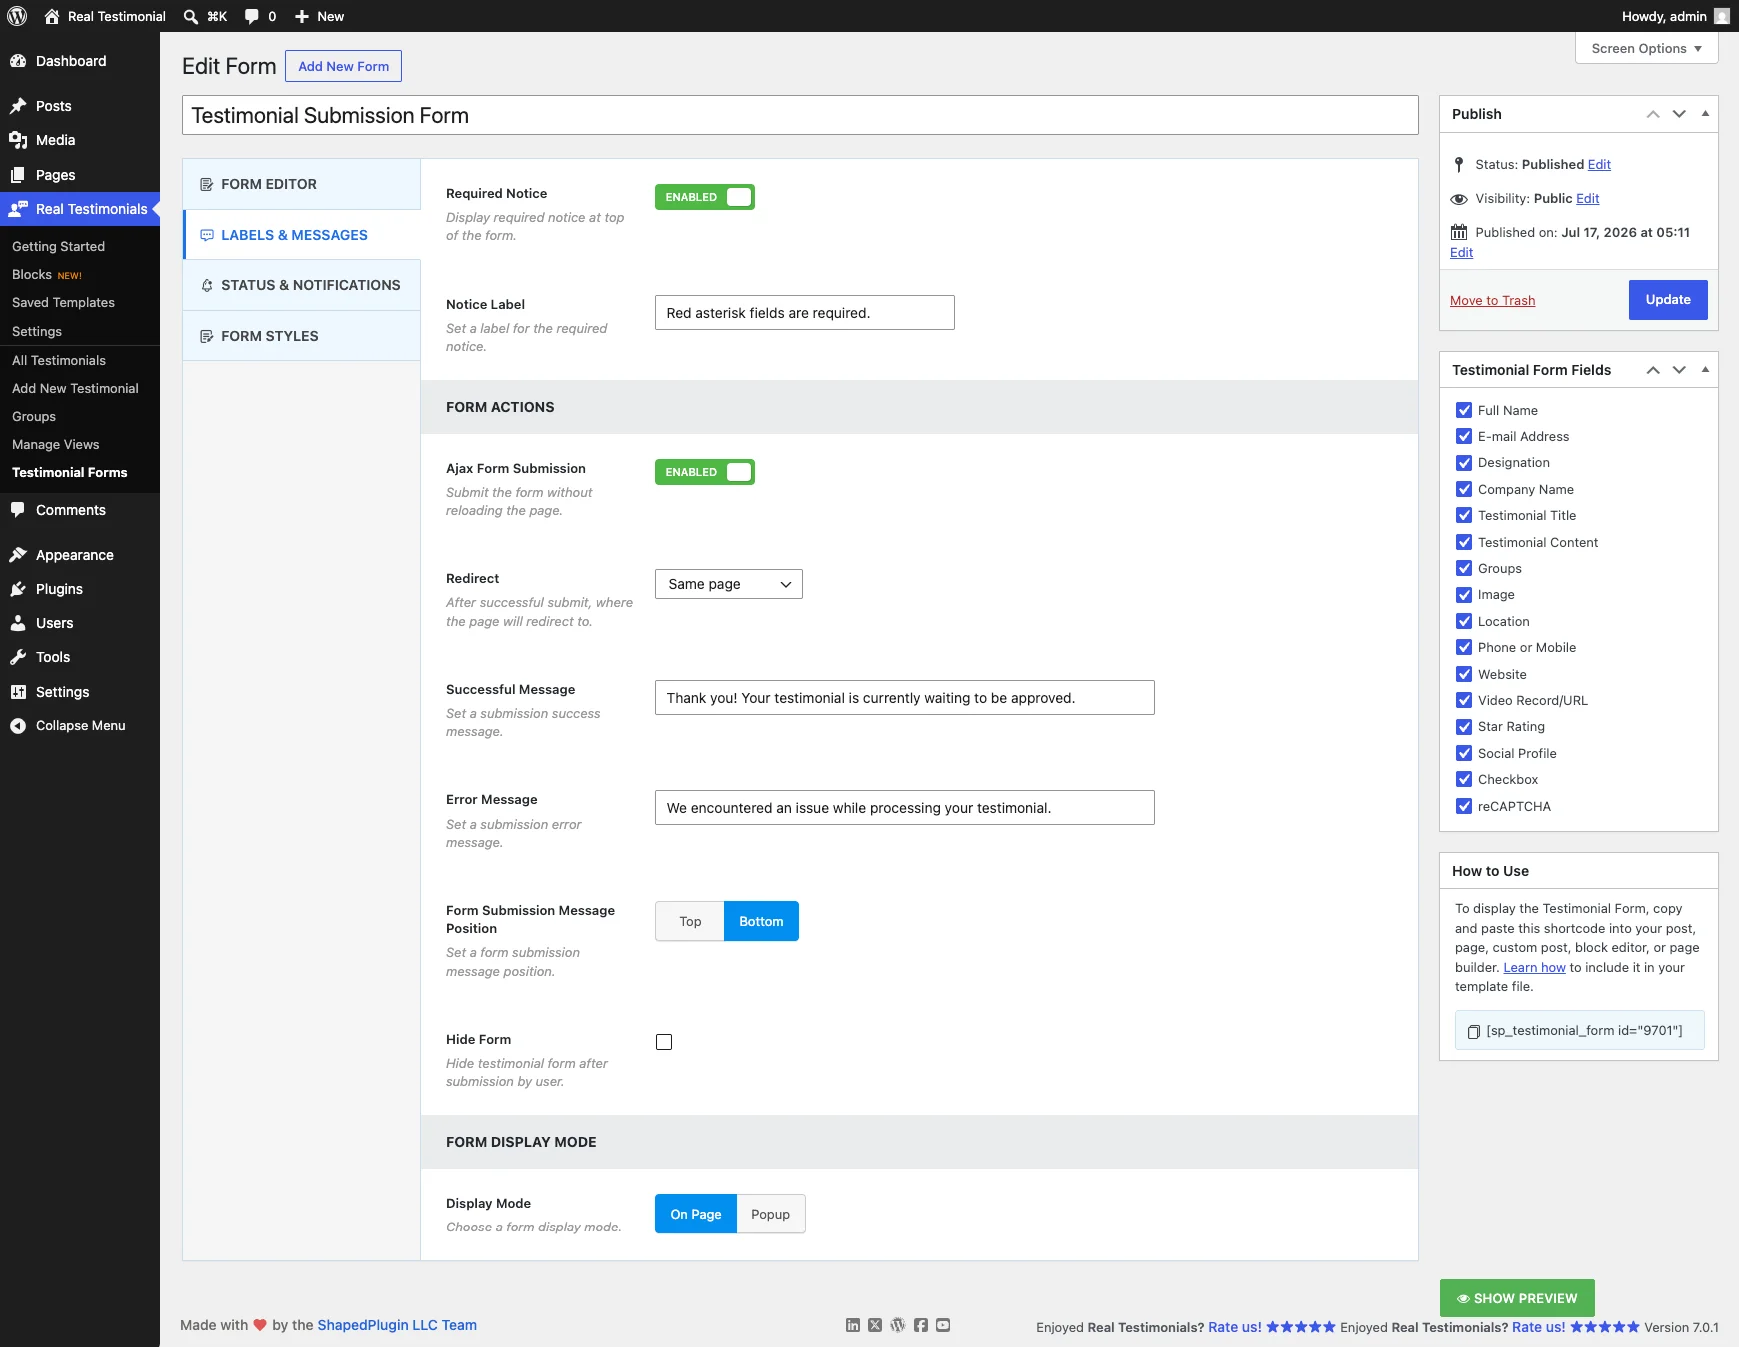
- Required Notice — a note at the top of the form pointing out the mandatory fields. On by default, with an editable Notice Label (default: "Red asterisk fields are required.").
- Ajax Form Submission — submit without reloading the page. On by default. It also reveals a Hide Form option, which makes the form disappear after a successful submission.
- Redirect — where the reviewer goes after submitting:
- Same page (default) — they stay put and see your Successful Message (default: "Thank you! Your testimonial is currently waiting to be approved."), shown at the Top or Bottom (default) of the form.
- To a page — send them to a page you pick.
- To a custom URL — send them to any link.
- Error Message — what shows if something goes wrong with the submission.
- Display Mode — show the form On Page (default), or as a Popup opened by a button or text link with a label you choose (default: "Leave Your Review").
Status & Notifications
Sets the approval status of new submissions and the emails that go out around them.
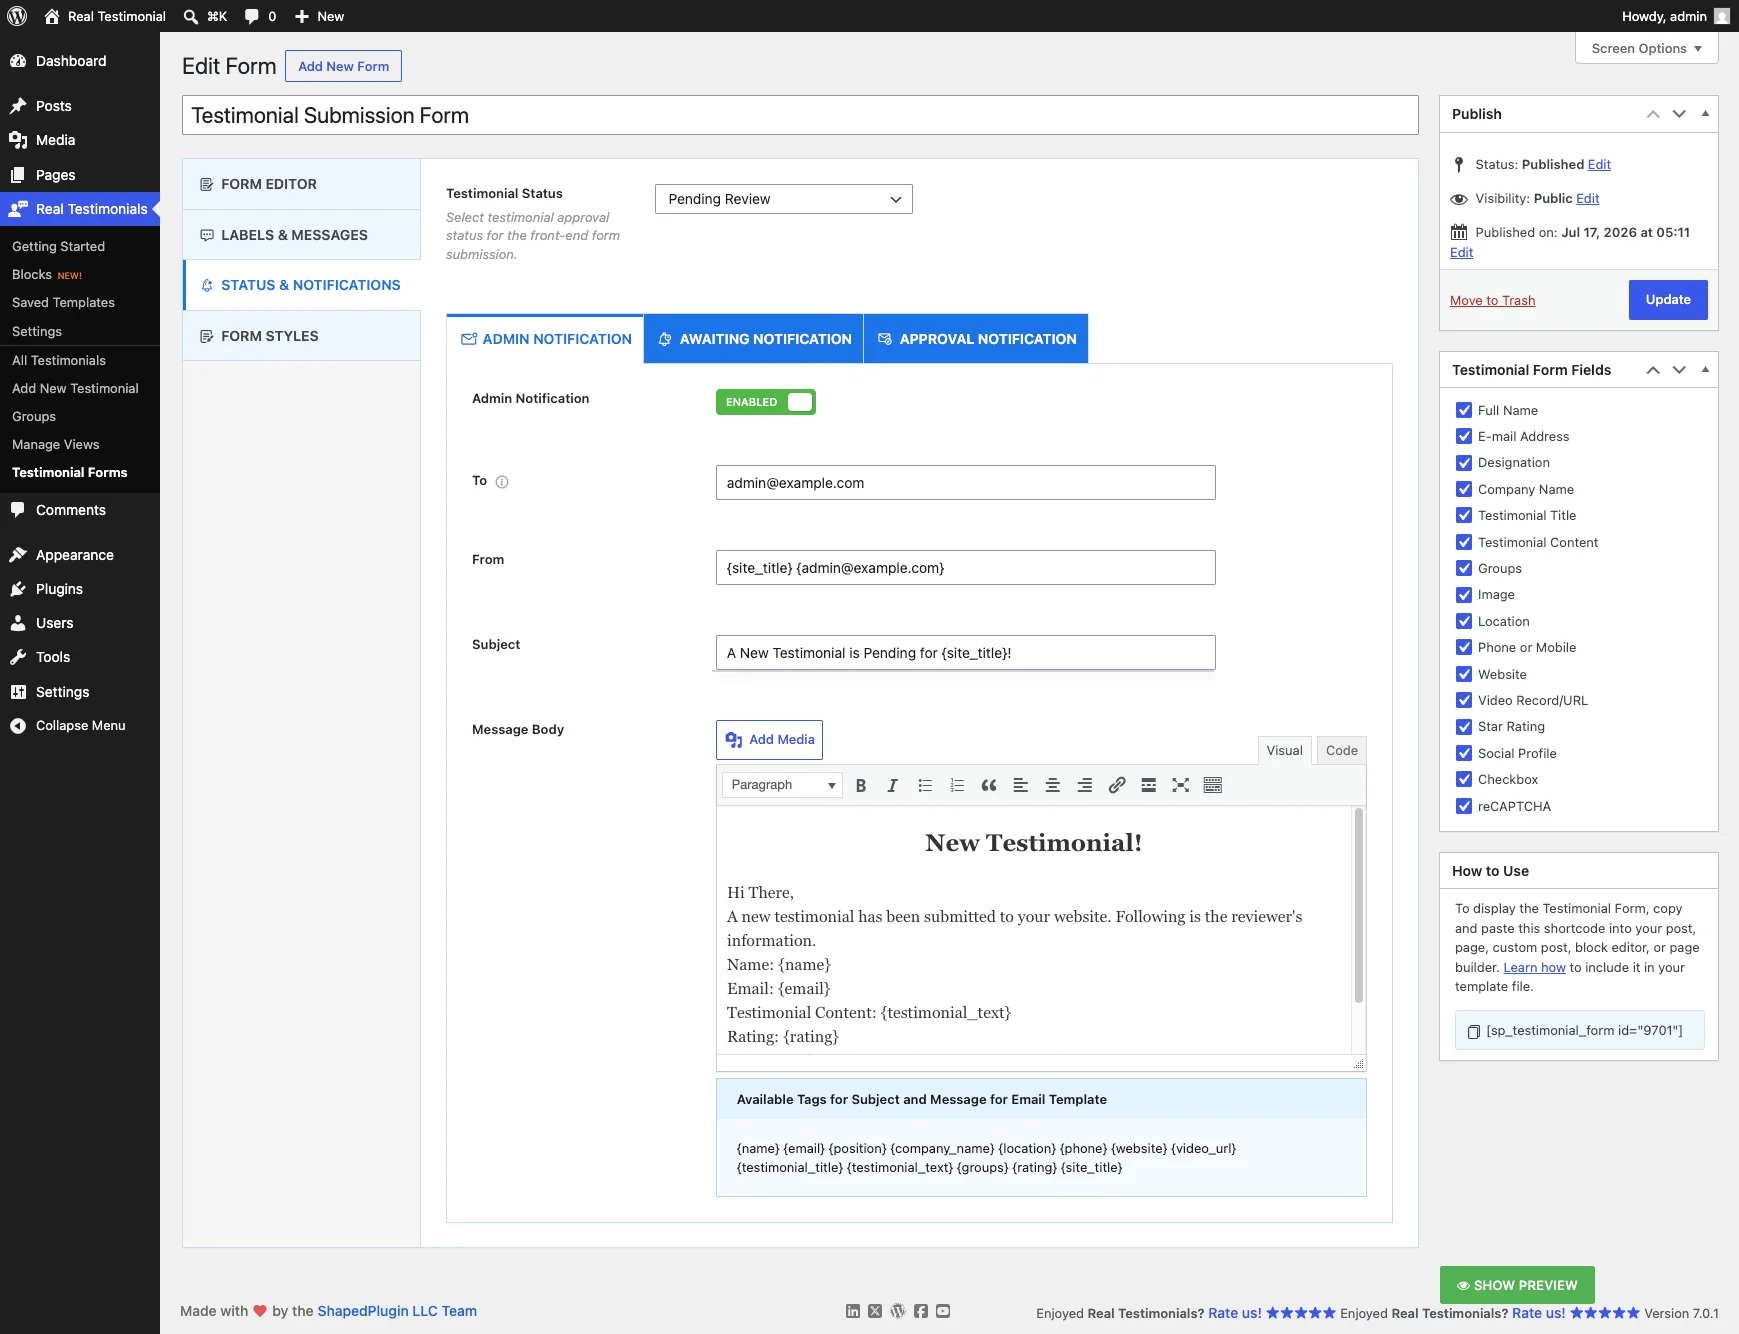
Testimonial Status — the status a front-end submission gets:
- Pending Review (default) — nothing goes live until you approve it. The safe choice.
- Private or Draft — stored but not published.
- Auto Publish — goes live immediately.
- Auto Publish Based on Star Rating — only submissions with the ratings you check (5- and 4-star by default) publish automatically; the rest wait as pending.
Below that sit three separate email notifications, each with its own on/off switch, To, From, Subject, and Message Body (a rich-text editor, so HTML is fine):
- Admin Notification — emails you when a new testimonial arrives. On by default, sent to the site admin email — add more recipients separated by commas.
- Awaiting Notification — emails the reviewer to confirm their testimonial was received and is awaiting approval. (Hidden when the status is Auto Publish.)
- Approval Notification — emails the reviewer when you approve and publish their testimonial.
In any subject or message body, use these template tags — they're replaced with the submission's details:
| Tag | Inserts |
|---|---|
{name} | Reviewer's full name |
{email} | Reviewer's email address |
{position} | Reviewer's designation |
{company_name} | Reviewer's company name |
{location} | Reviewer's location |
{phone} | Reviewer's phone number |
{website} | Reviewer's website URL |
{video_url} | Reviewer's video URL |
{testimonial_title} | Testimonial title |
{testimonial_text} | Testimonial content |
{groups} | The group(s) chosen |
{rating} | Star rating |
{site_title} | Your site's name |
Form Styles
How the form looks — layout, colors, and spacing.
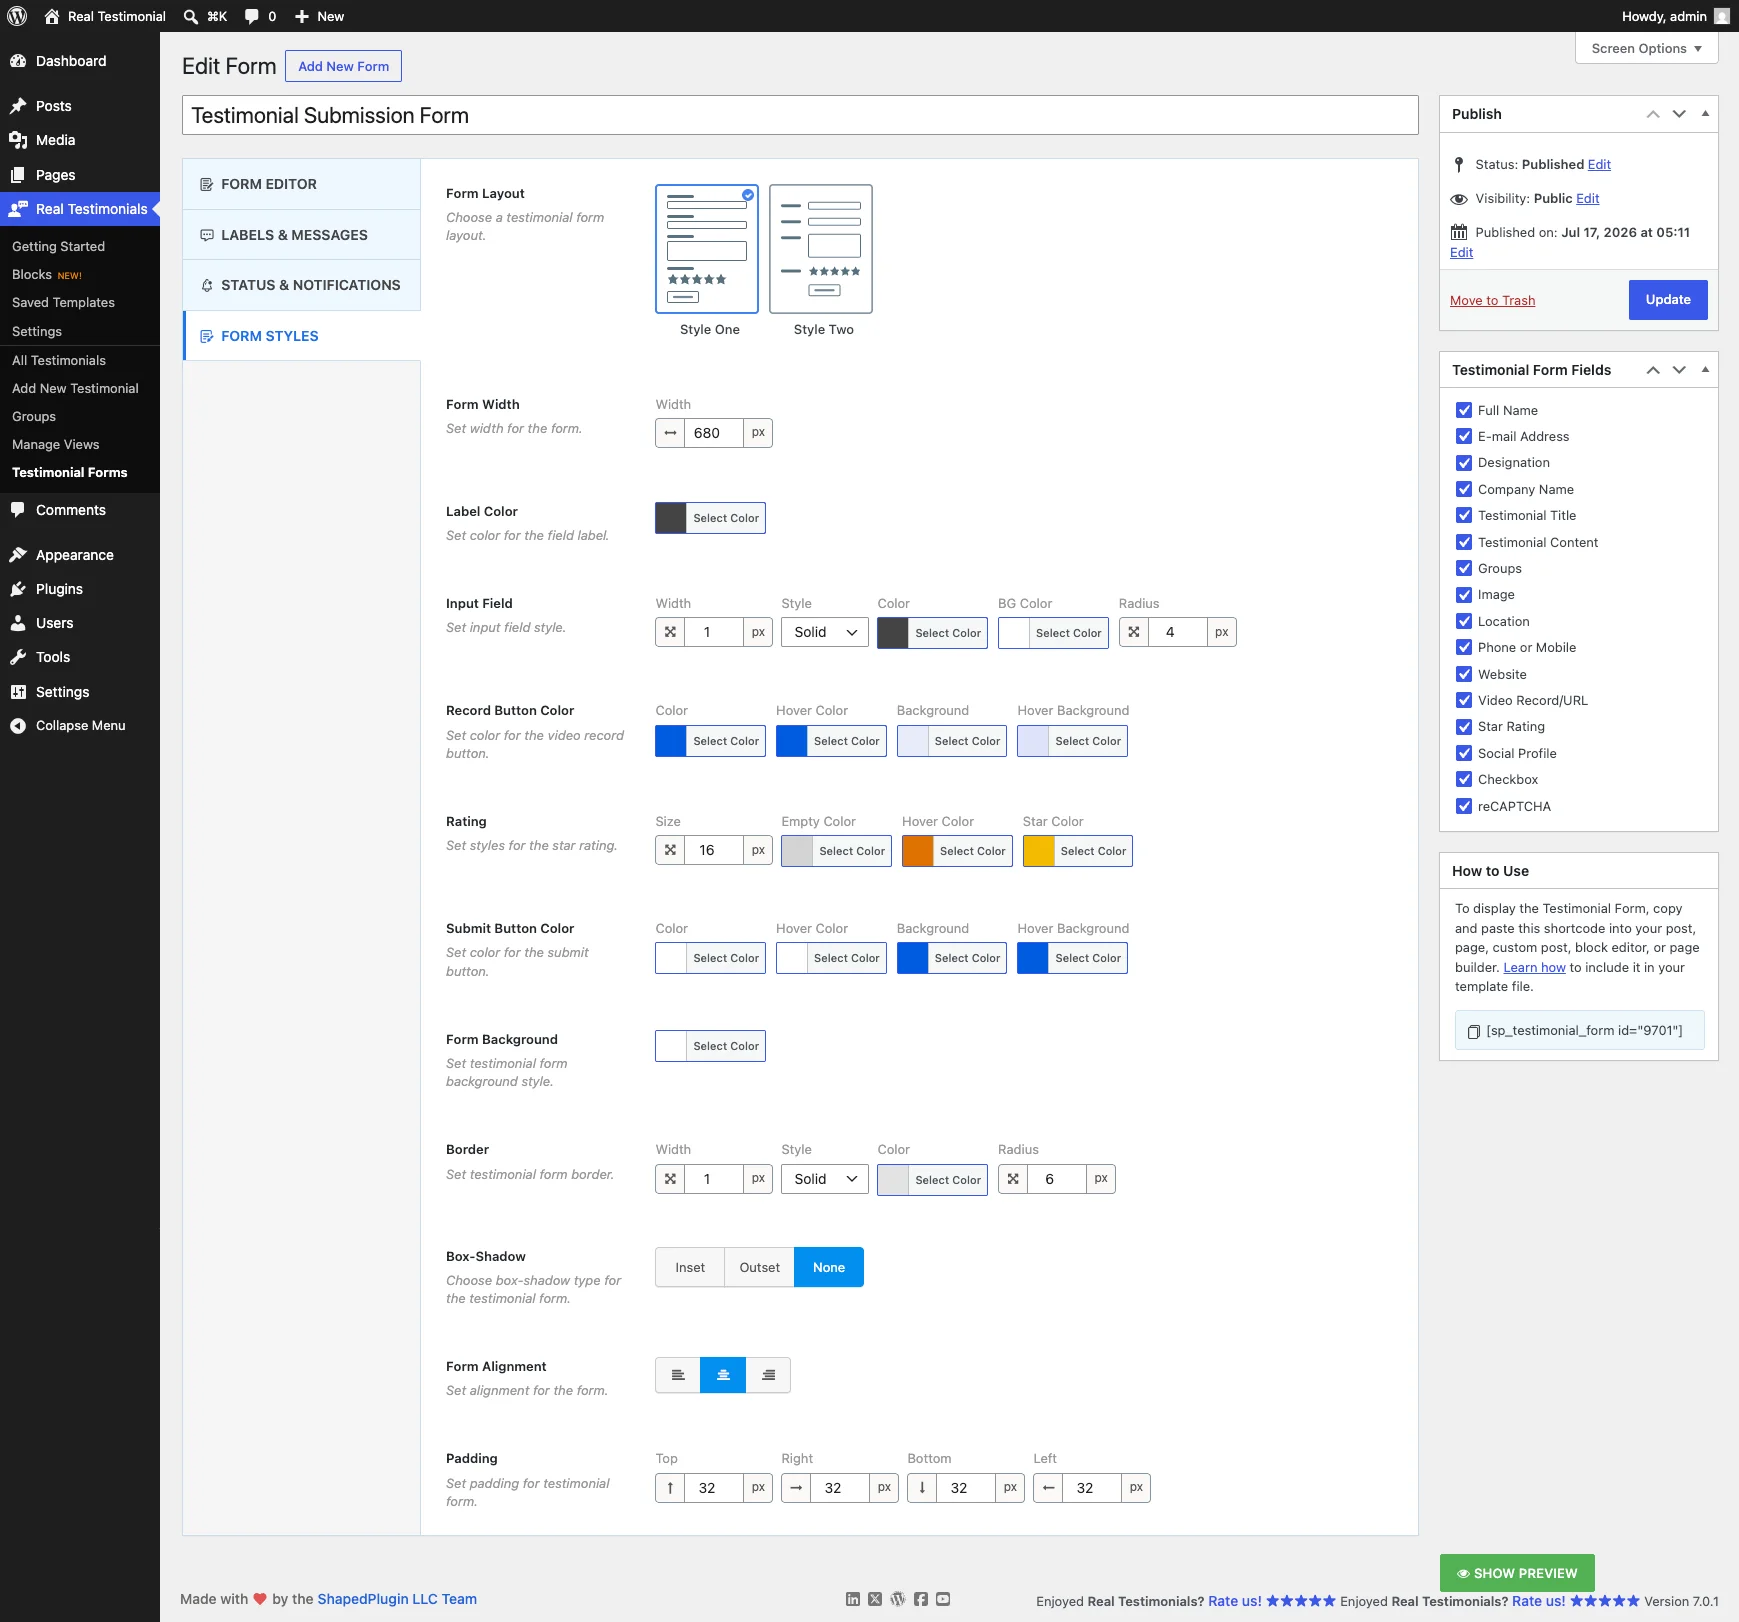
- Form Layout — Style One (default) puts labels above the fields; Style Two puts them to the left.
- Form Width — default: 680px.
- Label Color — the color of every field label.
- Input Field — border, corner radius, and background color for the inputs.
- Record Button Color — colors for the video record button.
- Rating — the star size, plus the empty, filled, and hover colors.
- Submit Button Color — color, hover color, background, and hover background.
- Form Background, Border, and Box-Shadow — the form's own container styling.
- Form Alignment — left, center (default), or right.
- Padding — space inside the form. Default: 32px.
Place the form on a page
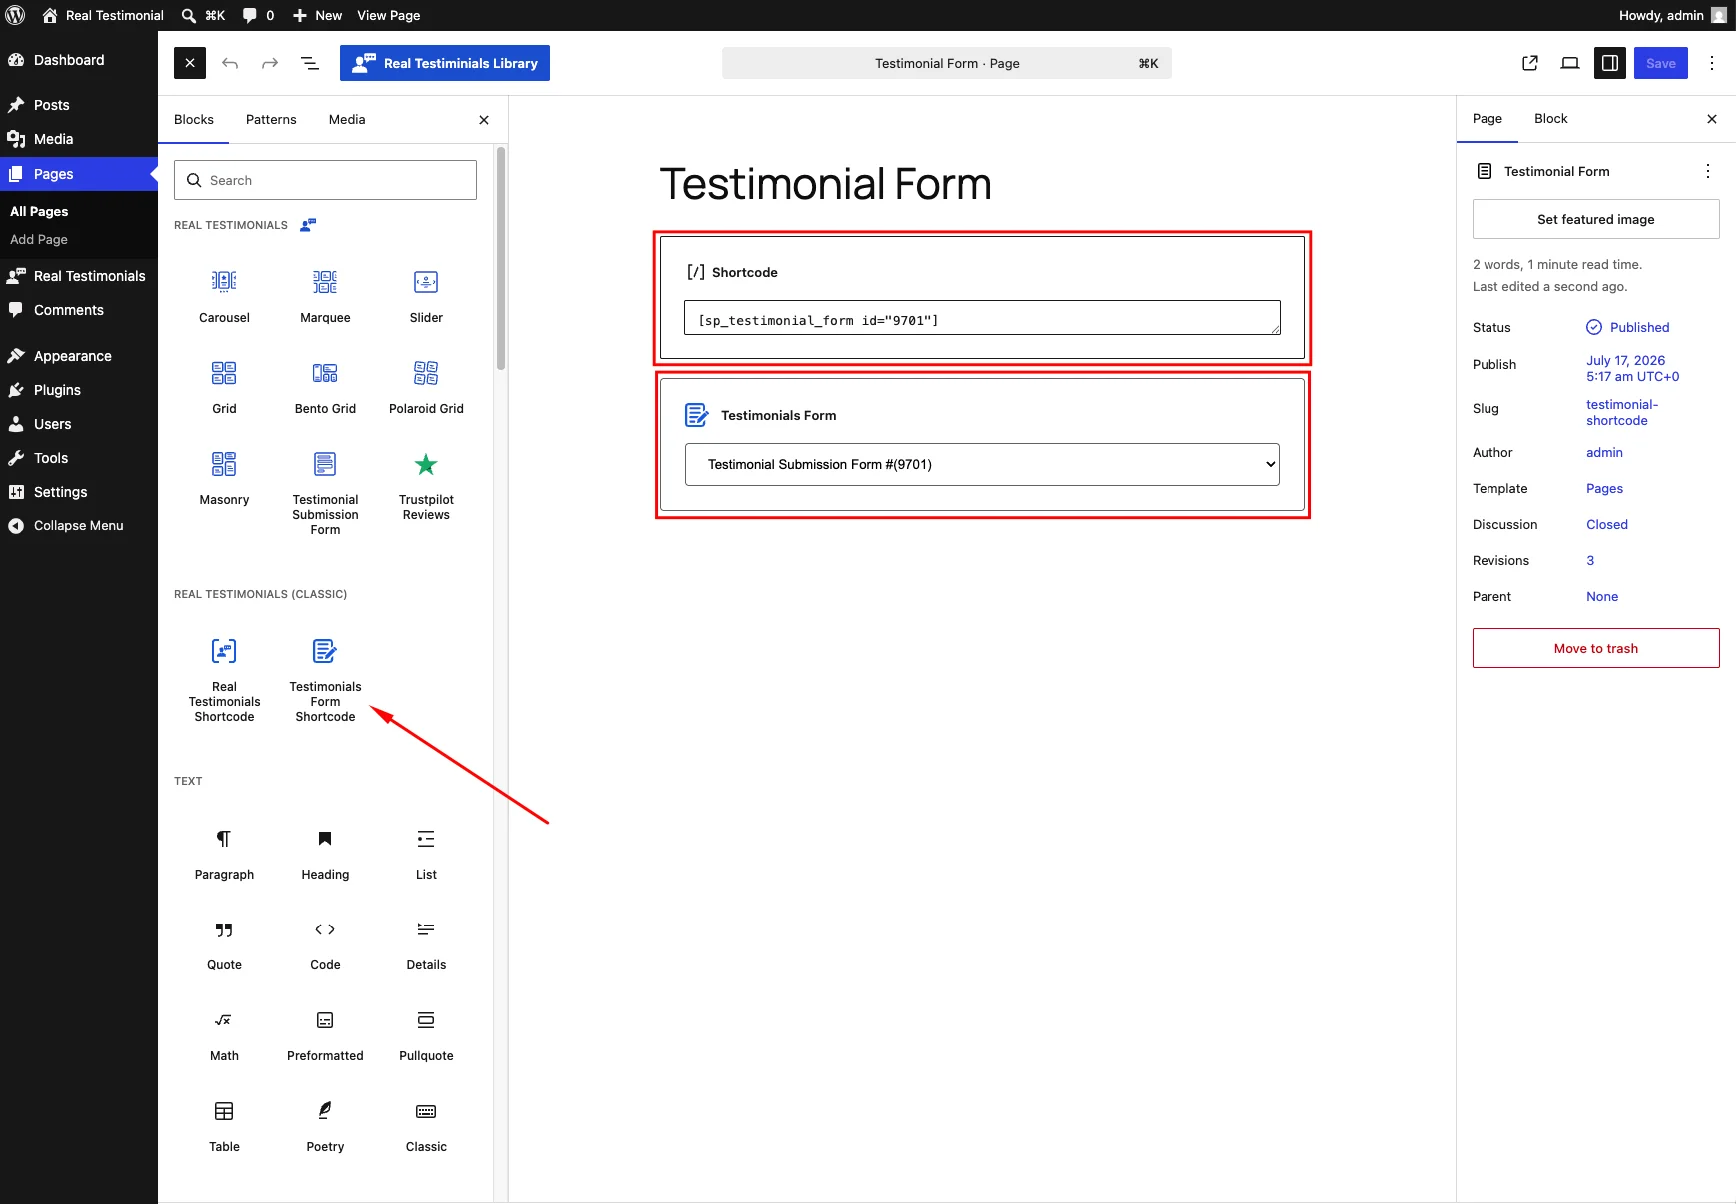
After you publish, the How to Use box shows the form's shortcode:
[sp_testimonial_form id="123"]The number is the form's own ID, filled in for you. Click it to copy, then paste it wherever you want the form:
- Block editor — a Shortcode block, or the Testimonials Form Shortcode block, which lets you pick the form from a dropdown.
- Classic Editor — paste it straight into the content.
- Widgets and page builders — the same shortcode works in Text/Shortcode widgets, Elementor, Divi, Bricks, and others.
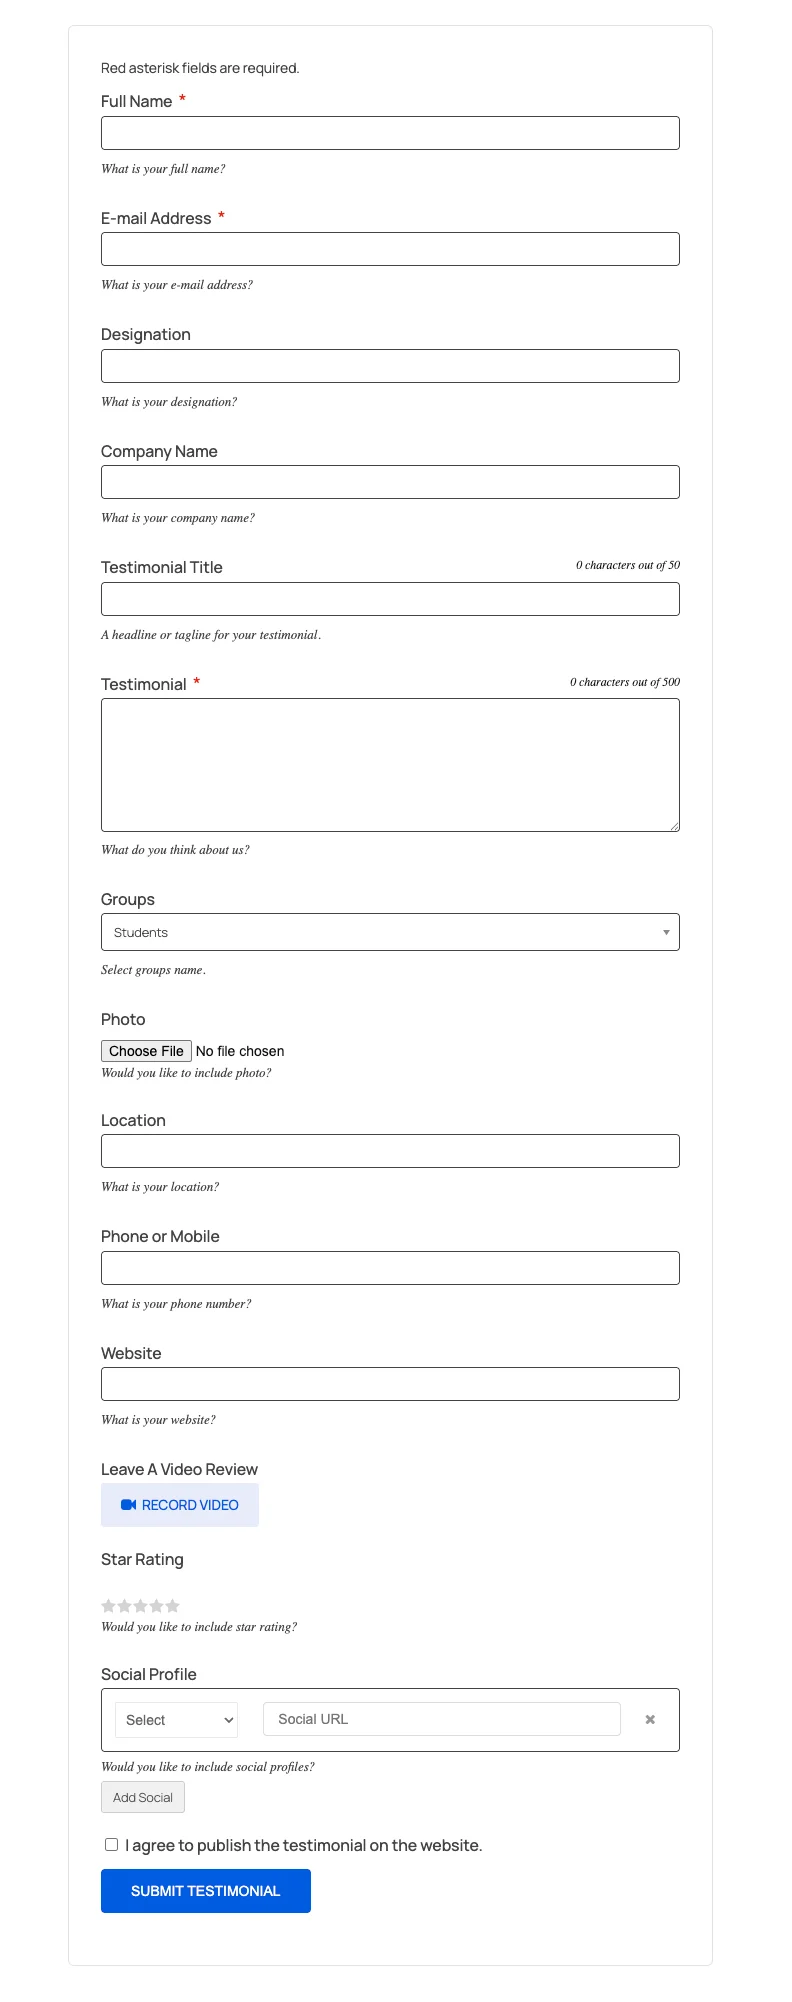
Save the page, and the form is live for visitors to fill in:
Placing it in a theme template file
Editing PHP directly? Wrap it so WordPress runs it:
<?php echo do_shortcode( '[sp_testimonial_form id="123"]' ); ?>The Testimonial Forms list screen has its own shortcuts: a copy-to-clipboard shortcode next to every form, and a color-coded Testimonial Status column showing which status each form assigns to new submissions.
What happens after someone submits
By default, every submission arrives in All Testimonials as pending — it does not go live automatically. Review it, edit if needed, then publish it to approve. A badge on the All Testimonials menu tells you how many are waiting. (You can change this default with Testimonial Status on the Status & Notifications tab.)
Spam protection
Because the form is public, protect it from spam bots. Add the reCAPTCHA field on the Form Editor tab, make sure the Spam Protection module is on, and enter your reCAPTCHA keys — the same setup covers both classic and block forms.
Related
- Manage Views — build a classic display layout.
- Submission Form block — the native, block-based form.
- Testimonials Form Shortcode block — place a classic form from a dropdown.