

Modules
Modules are Real Testimonials's plugin-wide feature switches. Flip one off and its feature goes away everywhere at once — the block editor, the block front end, the classic shortcode/View front end, and the testimonial edit screen. Turning off what you don't need keeps the plugin lean.
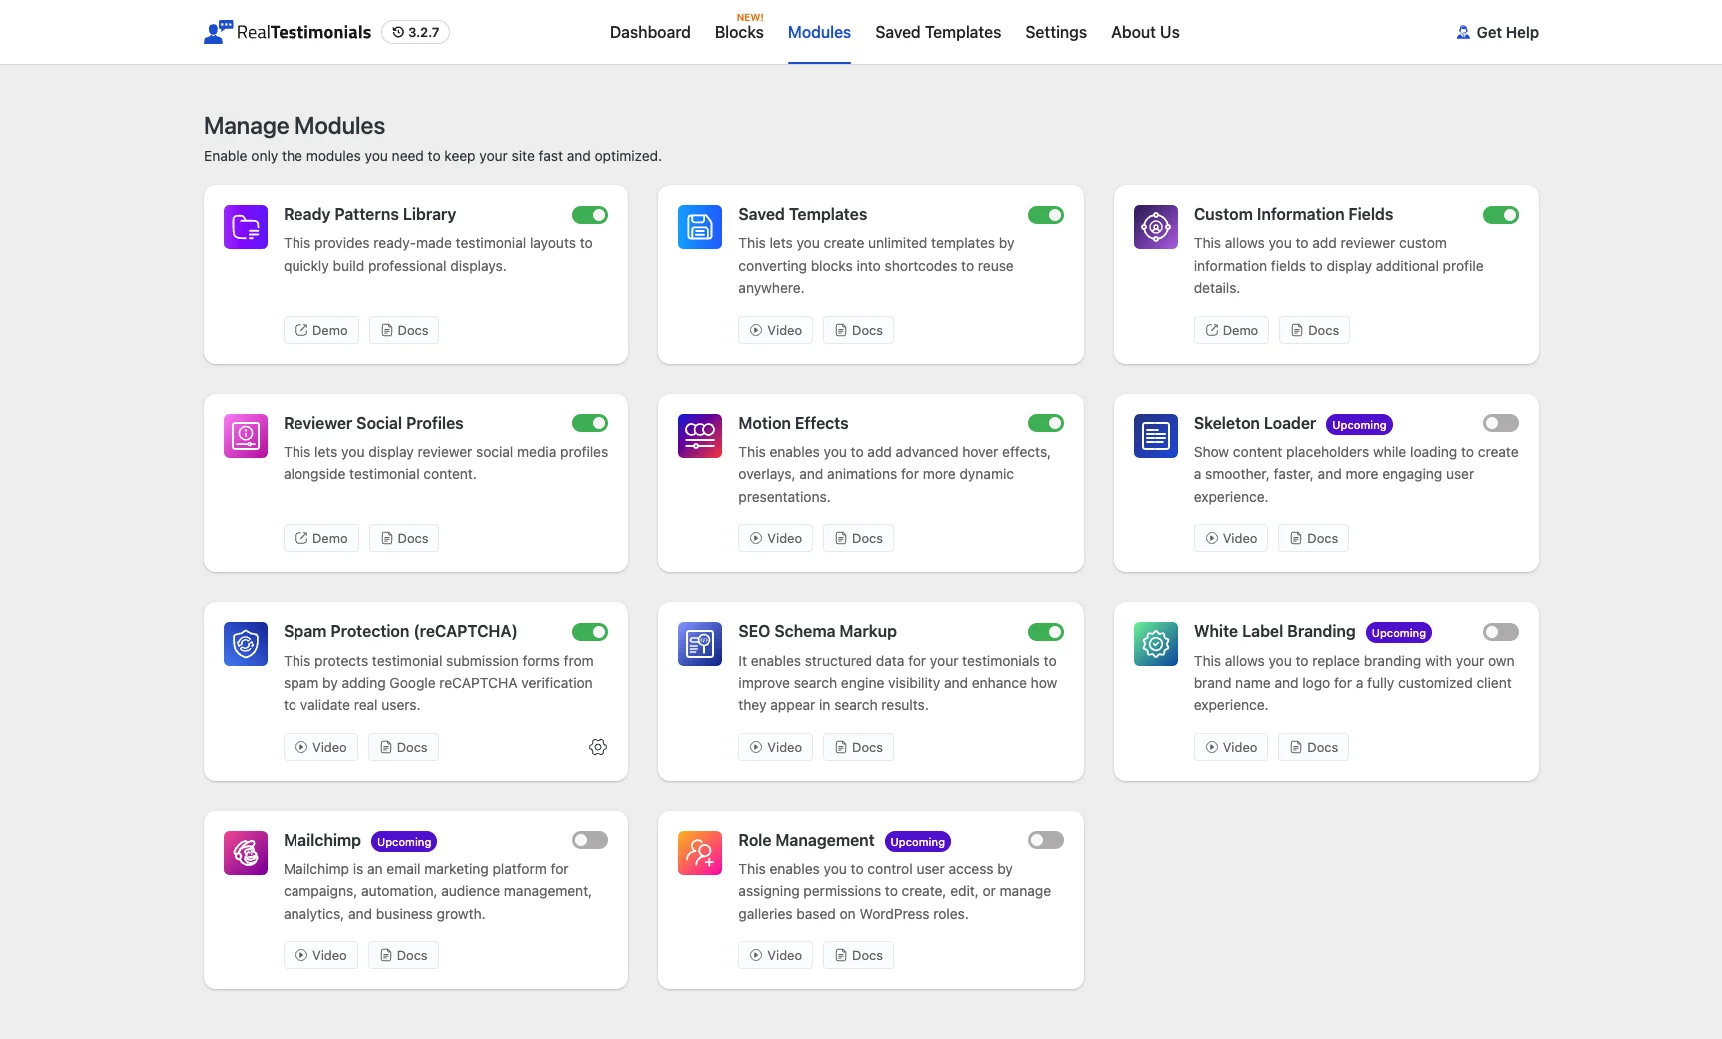
Opening the Modules section
- Open the dashboard from Real Testimonials → Getting Started.
- Click Modules in the navigation. The page is headed Manage Modules — "Enable only the modules you need to keep your site fast and optimized."
- Toggle any module on or off. There's no save button — each flip saves on the spot, and a small confirmation message pops up so you know it took.
Each module card also has quick Docs and Demo (or Video) links so you can see what a module does before switching it on. Everything starts enabled on a fresh install, so in practice this page is for switching off what you don't need.
Disabling a module never deletes data
When a module is off, its feature stops showing up and stops collecting input — everywhere. But anything you already saved (social links, custom field values, and so on) is preserved and reappears the moment you re-enable the module.
Available modules
| Module | What it adds |
|---|---|
| Ready Patterns Library | 225 ready-made testimonial layouts you can preview and insert from the block editor toolbar. |
| Saved Templates | Save block layouts as reusable templates. Toggling this also shows or hides the Saved Templates section in the dashboard nav and the matching WordPress submenu — the change happens instantly, no reload needed. |
| Export/Import Testimonials | Moves testimonials, Views and Forms between sites as a JSON or CSV file. Controls the Tools tab in Settings. |
| Custom Information Fields | Your own extra fields on testimonials and cards. |
| Reviewer Social Profiles | Social links for each reviewer. |
| Motion Effects | Entrance animations and scroll effects on blocks. |
| Spam Protection (reCAPTCHA) | reCAPTCHA on submission forms. |
| SEO Schema Markup | Lets your star ratings show up in Google search results. |
Upcoming modules
Four modules carry an Upcoming badge — they're listed so you can see what's on the way, but you can't toggle them on yet:
- Skeleton Loader — a loading placeholder while AJAX content fetches.
- White Label Branding — replace plugin branding with your own.
- Mailchimp — connect submissions to a Mailchimp audience.
- Role Management — control which user roles can manage testimonials.
Ready Patterns Library
The Ready Patterns Library is your shortcut to a finished testimonial section. Instead of adding a block and styling it panel by panel, you open a library of ready-made layouts, preview one, and insert it into the page as normal editable blocks.
Today's library holds 225 patterns across the eight display blocks, and it updates itself from ShapedPlugin's server, so the count grows over time.
Where to find it
The library opens from the block editor, not from the dashboard. Edit any page or post and look at the top toolbar, next to the inserter and undo/redo buttons — there's a blue Ready Patterns Library button.
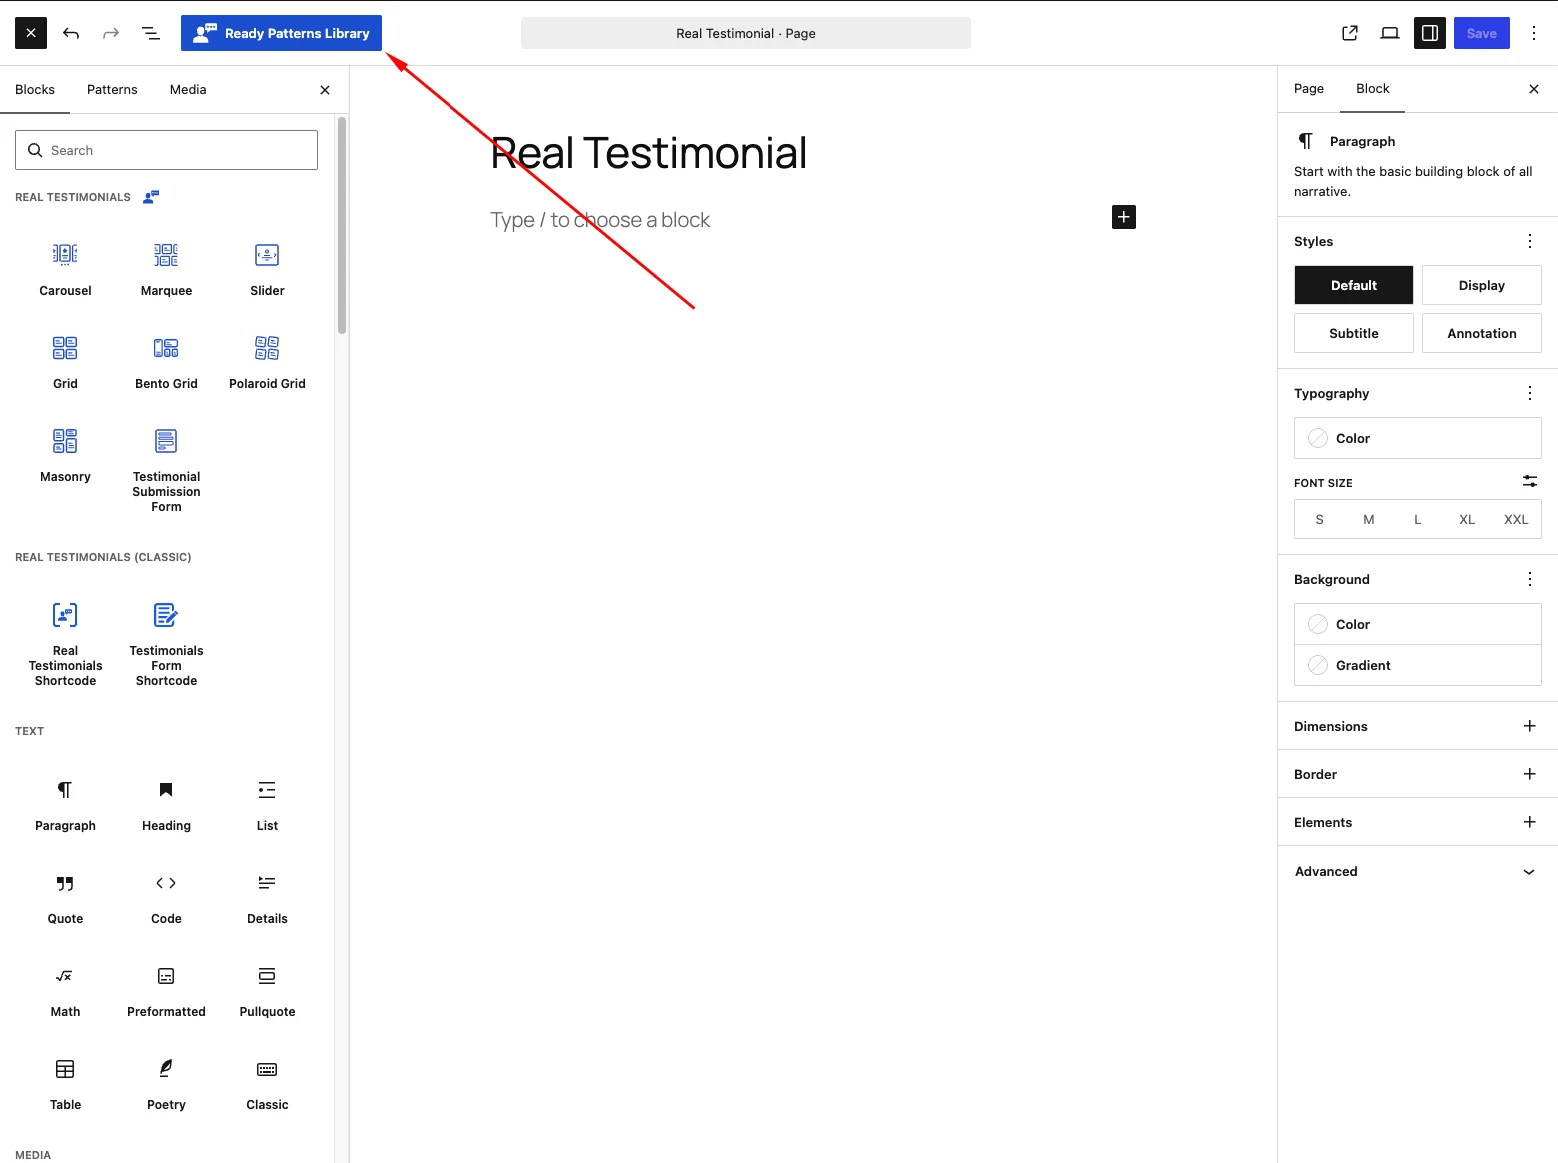
Click it and the library opens as a full-screen window over the editor.
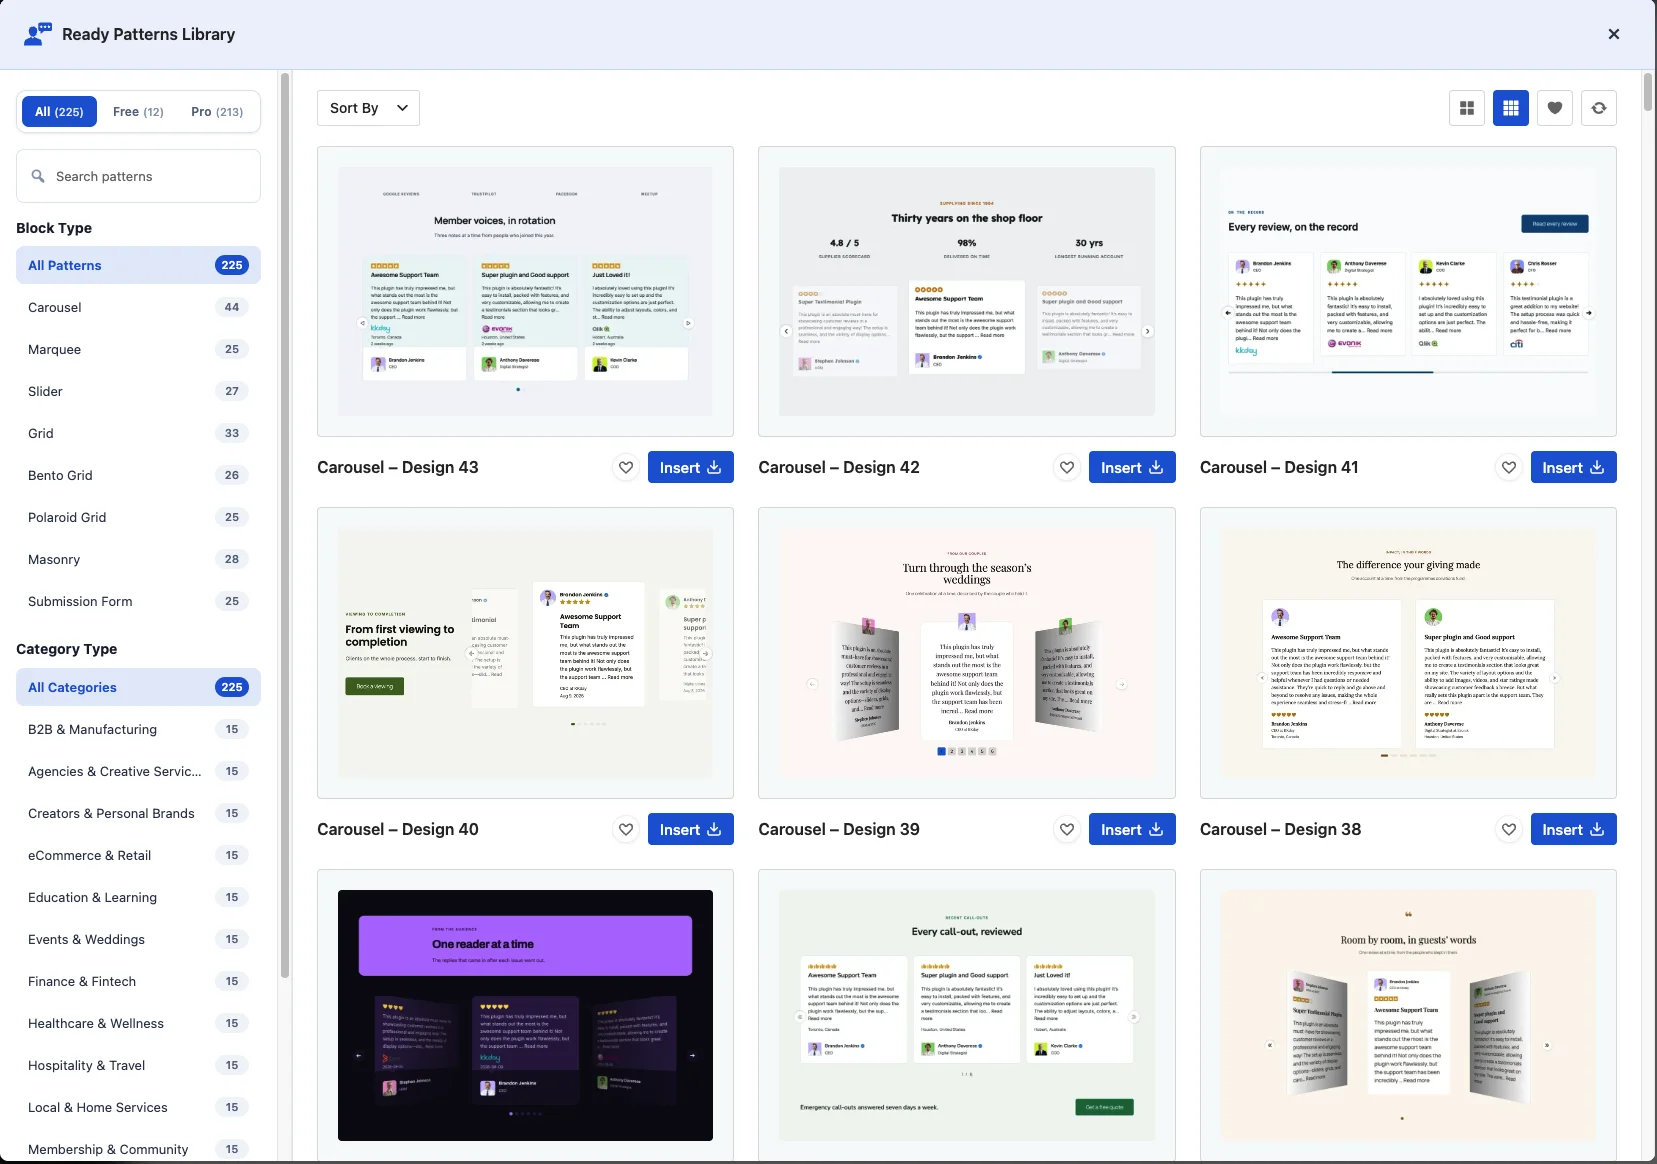
Two shortcuts in the dashboard open the same window on a brand-new page: Start with Ready Patterns on the Quick Start screen, and the Demo link on each card in the Blocks section. The Demo links arrive with that block's Block Type already selected, so you land on just the Carousel patterns, just the Grid patterns, and so on.
Finding a pattern
The sidebar down the left narrows the grid. Each row shows how many patterns match, so you always know how much you're looking at:
- All / Free / Pro at the top — a quick way to see only what your license covers.
- Search patterns — filters by pattern name as you type.
- Block Type — which block the pattern is built from: Carousel (44), Grid (33), Masonry (28), Slider (27), Bento Grid (26), Marquee (25), Polaroid Grid (25), and Submission Form (25).
- Category Type — 15 industry sets, so you can jump straight to designs made for your kind of site: B2B & Manufacturing, Agencies & Creative Services, Creators & Personal Brands, eCommerce & Retail, Education & Learning, Events & Weddings, Finance & Fintech, Healthcare & Wellness, Hospitality & Travel, Local & Home Services, Membership & Community, Nonprofits & Causes, Professional Services, Real Estate & Property, and SaaS & Software.
Above the grid sits a small toolbar:
- Sort By — leave it as-is for the default order, or switch to Popular (most-inserted first) or Latest (newest first).
- Column buttons — show the grid two-up for bigger thumbnails, or three-up to scan more at once.
- Heart icon — show only the patterns you've saved. Each card has its own heart to add or remove it, and the count sits on the toolbar button. The list is saved per site, so it's still there next time you open the library.
- Refresh icon — pulls a fresh copy of the catalog. The plugin caches the list and re-checks every three days on its own, so you only need this if you know new patterns just landed.
Previewing before you insert
Hover a card and a Preview button appears over the thumbnail. It opens the pattern as a live page inside the library, with Desktop, Tablet and Mobile buttons so you can check how the layout reflows before it touches your page.
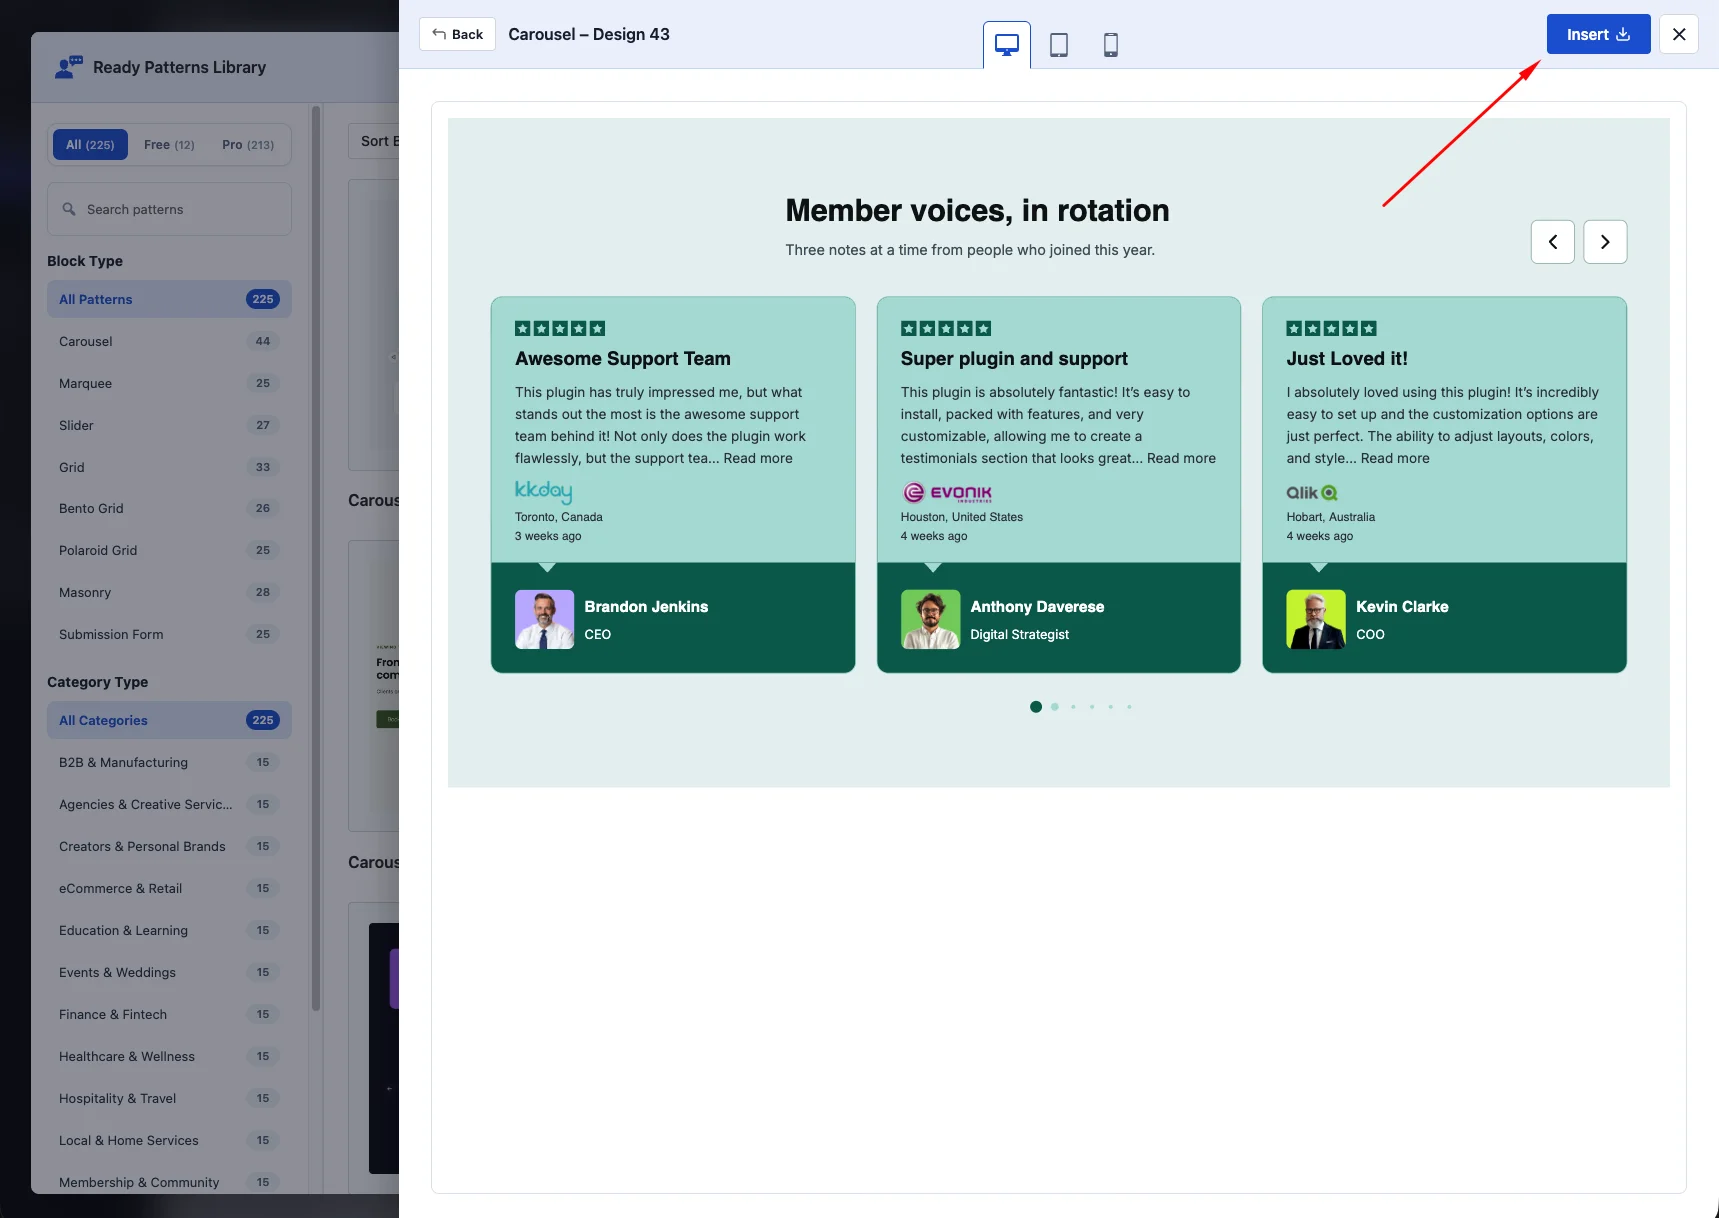
Insert is right there in the preview header, or on the card itself if you already know what you want. Either way the pattern is inserted at your cursor as ordinary Real Testimonials blocks — the button reads "Inserting…" for the second or two it takes to fetch.
Inserted patterns show your testimonials
A pattern brings the design, not the demo content. The query settings are reset on insert, so the block pulls your own testimonials straight away. Everything else — colors, fonts, spacing, layout — is yours to edit in the inspector like any other block.
Press Esc or click outside the window to close the library. From inside a preview, Esc takes you back to the grid first.
What happens when you disable it
- The Ready Patterns Library button disappears from the editor toolbar
- Patterns you already inserted keep working — they're plain blocks now, still fully editable
- The dashboard's Quick Start and Blocks links still open the library, because those are an explicit request for it
When to disable it
You rarely need to. The catalog is only fetched when you open the library, so it costs your visitors nothing. Turn it off to keep the editor toolbar clean — handy on a client site where the layouts are already built and you'd rather nobody swapped them out.
Saved Templates
The Saved Templates module powers the entire template system: saving layouts as reusable snippets, managing them in the dashboard, and re-inserting them anywhere on your site.
What it controls
- The Save as Template option in block menus
- The Saved Templates dashboard section (and its WordPress admin submenu)
- Template listing, editing, deletion, and shortcodes
- Template reuse across page builders (via integrations)
What happens when you disable it
- The Saved Templates link disappears from the dashboard navigation
- The WordPress submenu under Real Testimonials vanishes
- The "Save as Template" option is removed from block menus
- Existing template-based blocks continue rendering on the front end — they're saved as regular block content
Your templates themselves are not deleted. Re-enable the module and everything reappears exactly as you left it.
When to disable it
Disable if you never use templates and want a cleaner dashboard. If you rely on templates for consistent layouts across your site, keep this enabled.
Export/Import Testimonials
Sooner or later you'll need to move your testimonials somewhere else — to a staging site for a redesign, to a client's live site once you're done building, or into a backup file you can restore if something goes wrong. The Export/Import Testimonials module is what makes that possible: it downloads your testimonials (and the Views and Forms built around them) as a single file, and reads that file back in on any other site running Real Testimonials.
The module itself has no options. Its job is to switch the Tools tab in Settings on or off — that tab holds the actual Export and Import controls.
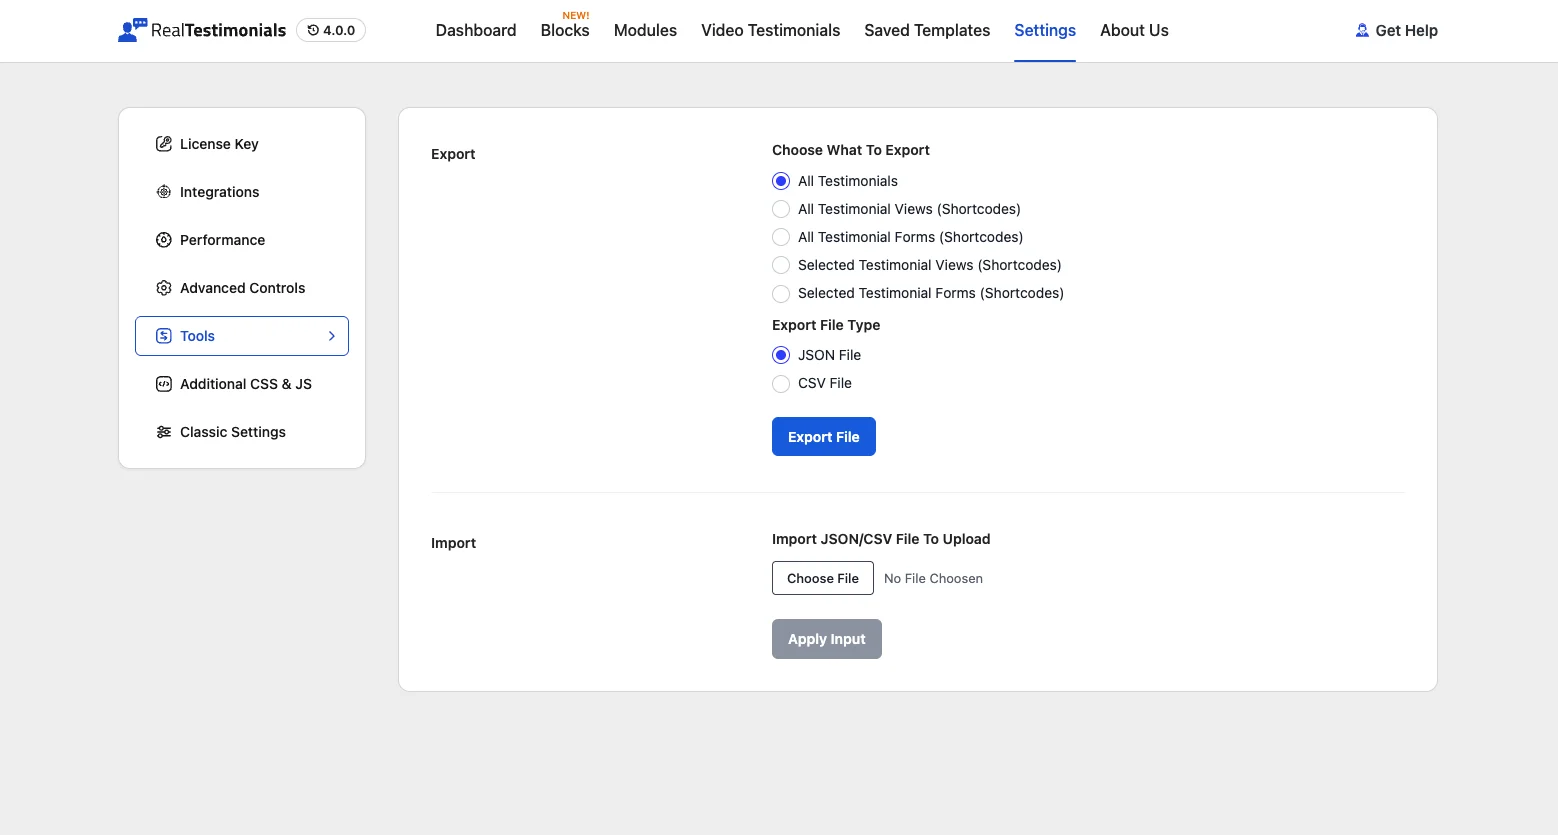
Where the controls live
- Open Real Testimonials → Getting Started to load the dashboard.
- Click Settings, then pick Tools in the tab sidebar.
- The tab is split in two: Export on top, Import underneath.
If you can't find the Tools tab, the module is switched off — turn Export/Import Testimonials back on in Modules and the tab reappears.
Exporting
Pick one of the five options under Choose What To Export. They're mutually exclusive — one export file holds one kind of thing:
| Option | What lands in the file |
|---|---|
| All Testimonials | Every testimonial: name, content, rating, reviewer details, custom fields, social profiles, the featured image URL, and any groups/categories it belongs to. |
| All Testimonial Views (Shortcodes) | Every saved View — the layout and all of its shortcode options. No testimonial content. |
| All Testimonial Forms (Shortcodes) | Every submission form and its settings. |
| Selected Testimonial Views (Shortcodes) | Only the Views you tick in the multi-select list that appears. |
| Selected Testimonial Forms (Shortcodes) | Only the Forms you tick in the multi-select list that appears. |
Choosing one of the Selected … options loads a searchable list of what's on your site. Pick at least one item — hit Export File with nothing selected and you'll get a "Choose at least one testimonial view" warning instead of a download.
Export File Type only shows up for All Testimonials, because it's the only export that makes sense as a spreadsheet:
- JSON File — the full, lossless format. Use this for migrations and backups.
- CSV File — one row per testimonial, openable in Excel, Google Sheets or Numbers. Handy when you want to review or bulk-edit your testimonials by hand.
Click Export File and your browser downloads testimonial-pro-export-<timestamp>.json (or .csv). The timestamp means repeat exports never overwrite each other. JSON exports also record the plugin version and the export date at the top of the file, so you can tell old backups apart.
What the CSV looks like
The CSV is also the easiest way to create testimonials in bulk: export one testimonial, open the file, copy the row, and fill in your own data. The columns are, in order:
version, date, all_testimonial, title, original_id, category, content, image,
_edit_last, _edit_lock, _thumbnail_id, company_logo, name, email, designation,
company_name, location, country, phone, website, video_url, rating,
extra_fields, social_profiles
title is the testimonial's title, content is the testimonial text, name is the reviewer, rating is a number from 1 to 5, and image is a full URL to the reviewer's photo.
Two things about the format will look odd until you know why:
- Commas and quotes inside a value get swapped out. In the columns that hold structured data (
category,company_logo,extra_fields,social_profiles), commas are stored as|and double quotes as'so they don't break the CSV grid. The importer swaps them back. Leave that packing alone when you edit a file. - Line breaks in the testimonial text are flattened to spaces, and any
"in it becomes\dq. Again, the importer reverses it.
If you're hand-writing rows, stick to plain text in content and you'll be fine.
Importing
The Import half is labeled Import JSON/CSV File To Upload:
- Drag your
.jsonor.csvfile onto the upload zone, or click Choose File and browse for it. Other file types are ignored. - Click Apply Input.
- On success you'll see an "Import completed." message, and after a moment the page takes you to the list of whatever you just imported — Testimonials, Views, or Forms — so you can check the result straight away.
A few things worth knowing before you click:
- Import always creates new entries. There's no matching or merging: run the same file twice and you get two copies of everything. Delete or trash the old items first if you're re-importing.
- Reviewer images are re-downloaded. The file stores an image URL, and the importer fetches it into this site's Media Library. So the old site needs to still be online and its uploads publicly reachable. Importing from a password-protected staging site, or from a site that's already been taken down, brings in the testimonials without their photos — you'll need to re-add those by hand. If an image with the same filename is already in your Media Library, it's reused instead of downloaded again.
- Testimonial content is sanitized. HTML is filtered on the way in, the same way WordPress filters post content. Embeds and
<iframe>tags in testimonial text may be stripped. - New site, new IDs. Views and Forms get fresh IDs on the destination site, so any
[sp_testimonial id="12"]shortcode you'd pasted into a page by hand won't point at the right View any more. Open the imported View, copy its new shortcode, and update your pages. Blocks aren't affected — they carry their settings with them. - CSV imports handle testimonials only. Views and Forms only travel as JSON.
- You need administrator access. Both export and import require the
manage_optionscapability, so editors and authors can't use this tab.
If one entry in the file is broken, the import reports the error and that single entry is thrown away — the rest still come through.
Moving a whole site, in order
Migrating everything? Do it in this order so nothing points at the wrong thing:
- On the old site, export All Testimonials as JSON.
- Export your Views, then your Forms (three separate files — one export per type).
- On the new site, install and activate Real Testimonials, then import the testimonials file first. Views and Forms reference testimonials, so the content needs to exist before them.
- Import the Views file, then the Forms file.
- Check each imported View's shortcode and update any pages that used the old IDs.
What happens when you disable it
- The Tools tab disappears from Settings, so nobody can export or import from the dashboard
- Nothing is deleted — your testimonials, Views and Forms are untouched
- Files you already exported stay valid; turn the module back on when you need to import one
When to disable it
Turn it off on a finished client site where you'd rather not hand over a one-click way to overwrite content with a stray import file. Everyday sites can leave it on — the module costs nothing on the front end, and having export ready is exactly what you want before the day you need a backup.
Custom Information Fields
Custom Information Fields lets you extend testimonials beyond the built-in details. Add whatever extra information matters to your use case: position, company, location, purchase date, custom credentials — anything at all.
Each field can display with an icon (from the included icon set) and render as plain text, a clickable link, an email address, or a phone number.
Where fields appear
With this module on, custom fields show up in three places:
- Testimonial edit screen — add and configure fields for each testimonial
- Submission forms — collect custom information from reviewers
- Block card parts — choose which fields to display and style them (labels, icons, colors)
Field types
- Text — plain text with optional icon
- Link — clickable URL (opens in new tab)
- Email — mailto link that opens the user's email client
- Phone/Number — clickable tel link for mobile dialing
- Date — date display with optional icon
What happens when you disable it
- Custom fields vanish from the testimonial edit screen
- The custom-fields section disappears from submission forms
- Blocks lose the Custom Information card part option
- Saved values stay in the database — re-enable and all your custom data returns
When to disable it
Disable if you never need fields beyond the built-in reviewer details (name, rating, image, company, position). If you collect specialized information — industry-specific credentials, location data, purchase details — keep this enabled.
Reviewer Social Profiles
The Reviewer Social Profiles module adds social-media links to each testimonial. Let reviewers link to their LinkedIn, Twitter, website, or any other profile — useful for B2B testimonials where credibility matters.
Where social profiles appear
With this module on:
- Testimonial edit screen — add social profile URLs
- Submission forms — reviewers can add their own profiles (if enabled)
- Block card parts — the Social Profiles part with icon, style, and layout controls
Supported platforms
The module includes icons for the major platforms:
- Twitter/X
- YouTube
- GitHub
- Website (generic globe icon)
- And more
What happens when you disable it
- Social profile fields vanish from the edit screen
- The social profiles section disappears from submission forms
- Blocks lose the Social Profiles card part
- Saved links stay preserved — re-enable and they reappear
When to disable it
Disable if you don't need social proof through reviewer profiles. For most business-to-business sites, portfolio sites, or agency pages, social links add credibility — consider keeping it on.
Motion Effects
Motion Effects brings blocks to life with entrance animations, hover effects, and scroll-triggered animations. Cards slide in, fade up, or zoom as they enter the viewport — subtle movement that guides attention and makes the page feel polished.
What it powers
With this module on, every display block gets a Motion Effects panel in the inspector with:
- Entrance Animation — how cards appear when scrolling into view (fade, slide, zoom, bounce, etc.)
- Animation Delay — stagger animations for a cascading effect
- Animation Duration — control how fast animations play
- Hover Effects — what happens when users hover over cards (scale, lift, shadow)
Animation types
Common entrance animations include:
- Fade Up — cards fade in and slide upward (classic, clean)
- Slide In — from left, right, bottom, or top
- Zoom In — cards scale up from smaller to full size
- Bounce — playful entrance with a subtle bounce
- Flip — 3D flip effect
- And more
What happens when you disable it
- The Motion Effects panel disappears from all block inspectors
- Existing blocks keep their saved motion settings — they just don't render
- No animation scripts load on the front end (slight performance gain)
When to disable it
Disable if you prefer a static design or want to minimize JavaScript on the front end. Modern browsers handle animations well, but if performance is your top priority and every kilobyte matters, this is one of the few modules that affects front-end script loading.
Spam Protection (reCAPTCHA)
The Spam Protection module adds Google reCAPTCHA to submission forms — both the block Submission Form and the classic testimonial form. It filters out bots while letting real people submit reviews.
How it works
When a visitor submits a testimonial, reCAPTCHA runs a quick check behind the scenes:
- reCAPTCHA v2 — the classic "I'm not a robot" checkbox (or an invisible challenge)
- reCAPTCHA v3 — runs silently in the background, scores the submission without user interaction
Suspicious submissions get blocked before they hit your database.
Configuration
After enabling the module, click the settings icon on the module card to configure:
- reCAPTCHA Version — Choose v2 (checkbox, visible to users) or v3 (invisible, score-based)
- Site Key v2 / Secret Key v2 — Enter your v2 keys if using v2
- Site Key v3 / Secret Key v3 — Enter your v3 keys if using v3
Get your keys free at www.google.com/recaptcha/admin/create:
- Add your site label and domain(s)
- Choose the reCAPTCHA type (v2 or v3)
- Accept the terms and submit
- Copy the Site Key and Secret Key into the module settings
What happens when you disable it
- The reCAPTCHA field disappears from all submission forms
- No reCAPTCHA scripts load on pages with forms
- Submissions bypass the spam check entirely
When to disable it
Disable if:
- Your forms are password-protected or only available to logged-in trusted users
- You use a different spam protection method (like a honeypot field or another plugin)
- You're on an intranet or internal site where bots aren't a concern
For public-facing forms, keep it enabled — spam submissions can clutter your database quickly.
SEO Schema Markup
The SEO Schema Markup module adds structured data (JSON-LD) to your pages so search engines like Google can understand your testimonials and display star ratings in search results.
What it does
When enabled, the module injects invisible schema markup into the page footer:
- AggregateRating — your overall rating and review count
- Review items — individual testimonials with author, rating, and text
Google may use this data to show rich snippets — your page title with ★★★★★ stars attached — which can significantly improve click-through rates from search results.
What's included
For each testimonial displayed on the page:
- Author name — the reviewer's name (or "Anonymous" if omitted)
- Rating — the star rating (1–5)
- Review body — the testimonial text
- Date published — when the testimonial was submitted
These get rolled into an Organization node with your site's aggregate rating.
What happens when you disable it
- No schema markup is added to pages
- Existing search results may keep showing stars for a while (Google caches this data)
- New pages and re-crawls won't pick up rating markup
When to disable it
Disable if:
- You're on an intranet or private site (not indexed by search engines)
- You're using a different structured data solution
- You want full control over your schema markup and prefer to add it manually
For public sites that care about search visibility, keep this enabled — rich snippets are one of the highest-impact SEO features available.
Related pages
- Dashboard overview
- Integrations — where AI and page-builder integrations are configured.
- Add New Testimonial — where social profiles and custom fields appear on the edit screen.