

Record Video
Let visitors record a video testimonial with their webcam (or upload one) and send it straight to your site.
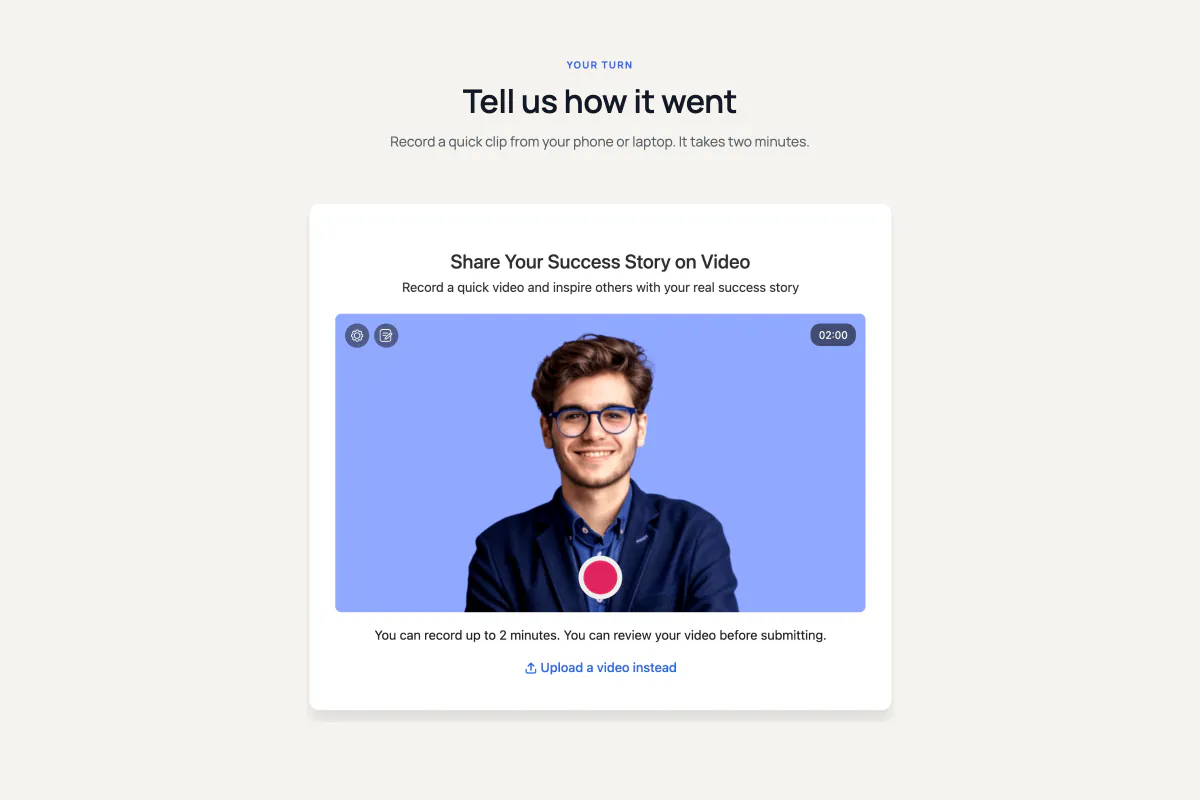
The Record Video block (a ready-made content element you drop into the WordPress editor) puts a video recorder on your page. A visitor clicks Allow Camera, records a short clip, watches it back, fills in a few details and hits submit. The clip shows up in your admin as a pending testimonial, waiting for your approval.
Think of it as the video version of the Testimonial Submission Form. The idea and the field builder are the same. The difference is that it's built around a camera instead of a text box.
When to use it
- You're building a "share your story" page, and a written review just wouldn't carry the same weight.
- You have a thank-you page after a purchase or onboarding. The customer is already feeling good about you, so it's a good moment to ask.
- You're running a campaign and want a few genuine, unpolished clips instead of a studio shoot.
Recording needs HTTPS
Browsers only hand over a camera on a secure connection. On a plain http:// site the recorder won't start. Visitors can still use the upload option, but nobody will be able to record. The one exception is localhost while you're developing.
How to add it
- Click the + block inserter in the editor.
- Search for Record Video (under the Real Testimonials category) and select it.
- Open Video Recorder in the inspector (the settings sidebar on the right) to set the maximum clip length and whether uploads are allowed.
- Open Input Fields to choose what else you want to ask for besides the clip.
- Publish the page, then record a test clip yourself before you send anyone to it.
Prefer to describe it? With the Build with AI module on and an AI provider connected in AI Configuration, click Build with AI in the editor's top toolbar and describe the recorder you want. The Video Recorder starter ("a record video testimonial form with a square 1:1 recorder") is a good first try. To change a recorder that's already on the page, select it and click Refine with AI in the block toolbar. The AI can restyle the block and change things like the aspect ratio. It can also show, hide, relabel or require the fields already in the form. What it won't do is add fields, or touch the recording length, upload size limit, status, emails, redirect or spam settings.
What a visitor actually sees
The recorder moves through five stages on the page. It helps to know them, because most of the settings below change one stage or another:
- Permission: a camera-off icon, a short notice and an Allow Camera button. Nothing else is visible yet.
- Ready: the live camera preview, a record button, and a timer showing the maximum length you allowed.
- Recording: the timer counts down, and recording stops by itself when it hits zero.
- Review: the clip plays back, and the visitor can accept it or record again.
- Recorded: the clip is accepted and the details form appears.
Once permission is granted, two small tools appear over the camera preview. The gear lets the visitor choose which camera and microphone to use. The note pad is a place to jot down talking points. That pad belongs to the visitor: it stays in their browser and is never sent with the clip, so you can't use it to script them.
The tools stay hidden until the camera is on
Browsers won't tell a page which cameras exist until someone grants permission. So the gear and note buttons only show up after Allow Camera succeeds. That's normal, not a bug.
Finding your way around the inspector
| Panel | What it controls |
|---|---|
| Video Recorder | The recorder itself: clip length, shape, uploads, and what happens after recording. |
| Heading | The title and description above the recorder. |
| Popup Settings (Popup mode only) | The button that opens the recorder in a popup. |
| Input Fields | The details form: which fields, the terms checkbox, how they're laid out and styled. |
| Submit Button | The send button's label, icon and styling. |
| Form Status & Messages | What status submissions get, and the success and error messages. |
| Email Notification | Who gets emailed, and what those emails say. |
| Motion Effects | Entrance animation as the block scrolls into view. |
| Advanced Settings | The block's box (background, border, shadow, spacing), per-device visibility, custom CSS class and ID. |
Looking for a Form Container panel? There isn't one. The container's background, border, shadow and padding live in Advanced Settings → General instead.
Video Recorder
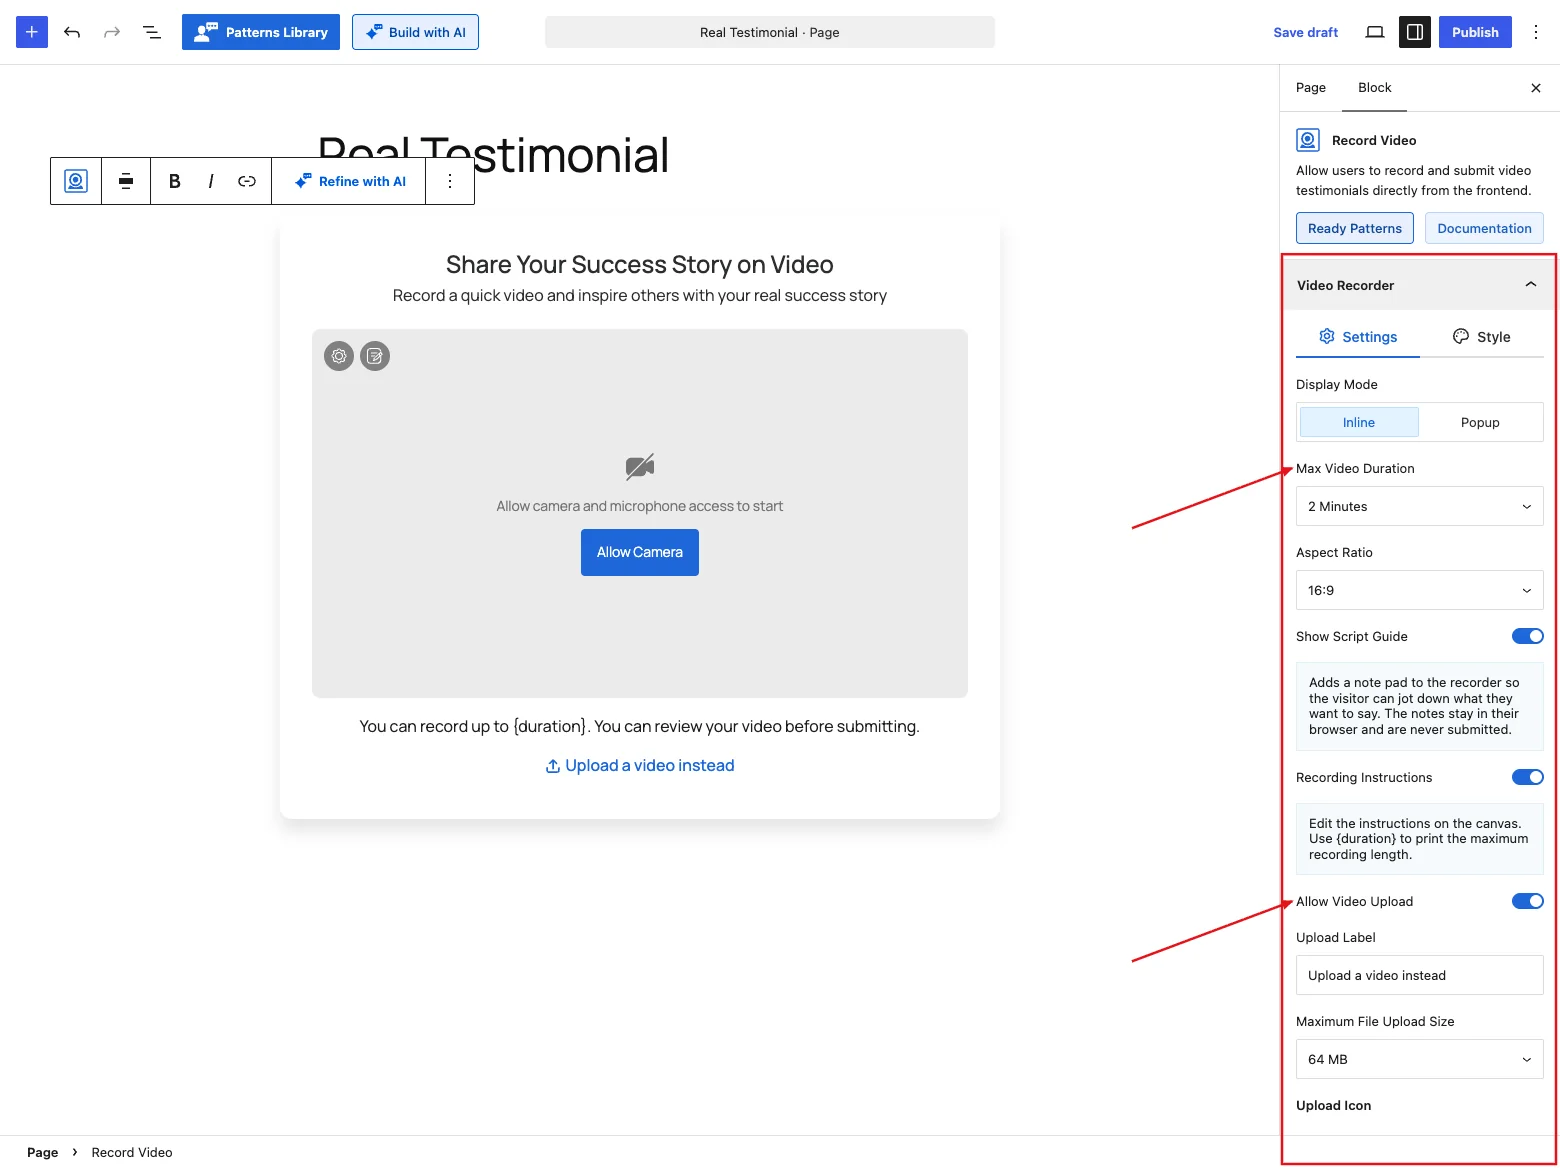
Settings tab
| Control | What it does |
|---|---|
| Display Mode | Inline (default) puts the recorder on the page. Popup puts a button on the page that opens the recorder in a lightbox. |
| Max Video Duration | 1 Minute, 2 Minutes (default), 3 Minutes or 5 Minutes. Recording stops automatically at the limit. |
| Aspect Ratio | 16:9 (default), 4:3, 1:1 or 9:16. Pick 9:16 if you expect people to record on a phone held upright. |
| Show Script Guide | Gives visitors the note pad over the camera preview. On by default. |
| Recording Instructions | Shows a line of guidance under the recorder. On by default. |
| Allow Video Upload | Lets visitors send an existing file instead of recording. On by default. |
| Upload Label (Allow Video Upload on) | The link's wording. Default Upload a video instead. |
| Maximum File Upload Size (Allow Video Upload on) | 16 MB, 32 MB or 64 MB (default). |
| Upload Icon (Allow Video Upload on) | An optional icon beside the upload link. Choose an Icon Source (the built-in Library or a Custom upload), then set its Icon Size (default 16 px). |
| Show Form After Recording | Holds the details form back until the clip is accepted, so the visitor does one thing at a time. On by default. |
| Alignment | Where the recorder sits in its container. Default center. |
| Accessibility | On by default. Leave it on. |
| Google reCAPTCHA | Adds spam protection. Off by default, and only shown when the Spam Protection module is on. Needs keys, see Spam protection. |
| Max Width | How wide the recorder gets. Default 720 px on desktop, 640 on tablet, 400 on mobile. |
The size limit applies to uploads, not recordings
Maximum File Upload Size caps files a visitor picks from their device. A clip recorded on the page is capped by Max Video Duration instead. Your web host's own upload limit still applies on top of both, and it's often lower than 64 MB. If uploads fail at a size you allowed, that's usually why.
Accepted video formats: MP4, M4V, WebM, OGV, MOV and MKV.
Style tab
- Recording Instructions (when Recording Instructions is on): typography, color and margin for the guidance line.
- Upload Button (when Allow Video Upload is on): typography, plus a Button Style popover with Normal and Hover states for color, background, border and shadow, then corners, padding and margin.
- Video Capture Area: the border and corner radius of the camera box. Default radius 8 px.
Heading
Settings tab
| Control | What it does |
|---|---|
| Show Title | The heading above the recorder. On by default. |
| Show Description | The line under the heading. On by default. |
| Alignment | Default center. |
Style tab
Typography, color and margin, set separately for the Title and the Description.
Five bits of wording are edited on the page, not in the sidebar
To change the title, the description, the permission notice, the Allow Camera button label or the recording instructions, click the text right on the block in the editor and type. The instructions can include {duration}, which gets swapped for the limit you set. You'll see the raw {duration} in the editor, but visitors see the real number.
Popup Settings
Popup mode only. On the Settings tab you set the trigger button's Label (default Record a Video) and Alignment. The Style tab handles its typography, colors, border, corners and spacing. If you've set up a popup on the Submission Form, you already know these; its Popup Settings section has the details. Inside the popup, the recorder keeps the box you styled in Advanced Settings → General.
Input Fields
This is the same field builder the Testimonial Submission Form uses, with the same field types, per-field options and validation. Record Video starts with only two required fields, Full Name and Your Email. Add anything else you need from Add New Field. RESET brings back those two.
Here's the Settings tab, from top to bottom:
| Control | What it does |
|---|---|
| Show Preview | An editor-only switch that reveals the form on the canvas while you design it, without changing what visitors see. Offered when Show Form After Recording is on. |
| Input Fields | The field builder itself. |
| Terms and Conditions | A required consent checkbox under the fields, with Terms Text, Terms Link Text and Terms And Conditions URL. It matches the one on the Submission Form. It lives in this panel because Record Video has no Form Builder panel. |
| Input Style, Label to Input Gap, Input to Note Gap | The shared layout controls, described on the Submission Form page. |
| Alignment | Text alignment inside the form. |
| Fields Gap | Space between fields. |
| Area Width | How much width the form takes beside the clip. Default 50% on desktop, 100% on tablet and mobile, so on a desktop the form sits next to the video and on a phone it sits under it. |
The Style tab has the Submission Form's Label, Note and Placeholder sections. It adds one more, Input Container, for a background color and padding (default 24 px) behind the form.
One field is worth calling out. Add Video URL and visitors get a third option: pasting a link to a clip that's already on YouTube, Vimeo or elsewhere. A form with that field shows its fields straight away instead of waiting for a recording.
Submit Button
Here you set the button's label (default Send Video), an optional icon with its position and size, the width, and Normal/Hover styling. It works just like the Submission Form's button, which its Submit Button section covers in full.
Form Status & Messages
This panel decides what happens to a submission and what the visitor is told afterward. The controls match the Submission Form's, so you can use its Status & Message Settings section as your guide.
The one setting to get right is Testimonial Status. It defaults to Pending, so clips wait for your approval. For video, that's almost always what you want.
Default messages:
- Success: Thank you! Your video testimonial is currently waiting to be approved.
- Error: We encountered an issue while processing your video.
Sometimes the clip itself is the problem. It might be too large, in an unsupported format, or the upload didn't finish. In that case the visitor sees the specific reason instead of the general Error message. Nothing is saved, so you won't end up with a testimonial that's missing its video. The Submission Form page lists every reason.
After a successful submit, the whole block resets itself for the next person. The exception is when you've set it to hide the form or redirect instead.
Email Notification
The block can send three emails. You get one when a clip arrives. The visitor gets one confirming it's awaiting review, and another if their clip is published the moment they submit (Auto Publish, or a rating that meets your threshold). All three are on by default, and you set them up here in the block, not on a global settings page. One catch: approving a pending clip later doesn't send the approval email. The controls and merge tags match the Submission Form's, explained in its Email Notification Control section.
Motion Effects
Want the recorder to animate in as visitors scroll down to it? This panel adds an entrance animation and an optional scrolling effect, set per device. The controls are shared with the display blocks, and the Carousel reference walks through each one.
Advanced Settings
This panel has three tabs. General holds the form container's Background Type, Border, Border Radius (12 px), Box Shadow (a soft shadow, on by default), Padding (32 px) and Margin. On the Submission Form, these same settings sit in Form Builder → Style. Visibility and Advanced (Custom CSS Class and Custom CSS ID) behave the same as on every other block, as described in the Carousel reference.
Spam protection
To keep bots out, use the Google reCAPTCHA toggle in the Video Recorder panel. It checks each submission with Google's "prove you're human" test. You'll only see it once the Spam Protection module is enabled, and it's off by default.
Add your keys before you switch it on
The keys aren't set in the block. You add them on the Spam Protection module card in Real Testimonials → Modules (click its settings icon). If the toggle is on but the keys are missing, the check can't run and every submission is refused with "Captcha verification failed." Logged-in administrators see a notice about the missing keys on the live page. Visitors don't.
What happens after someone submits
- The clip is uploaded to your site's media library. A still frame from the start of the video is saved with it and becomes its thumbnail.
- A new testimonial is created carrying the clip, the reviewer's details and whatever else your form asked for.
- It's saved with the status you chose, which is Pending unless you changed it.
- The emails you enabled go out.
- The clip appears in Real Testimonials → Video Testimonials, where you can watch it and publish it.
- Once published, it shows up in any Video Testimonials block on your site.
If the upload fails for any reason, nothing half-finished is left behind. The testimonial is removed again and the visitor is told what went wrong.
Tips
- Keep Max Video Duration short. Two minutes is plenty, and a shorter limit makes people more willing to start.
- Ask for as little as possible. Name, email and the clip are usually enough. Every extra field costs you submissions.
- Leave Show Form After Recording on. Recording a video is the hard part, and a form on screen at the same time makes it feel harder.
- Test on a phone as well as a desktop. Most people will record on a phone, and 9:16 suits that far better than 16:9.
- Tell people what you want them to say, in a line of text above the block. "What problem were you trying to solve?" gets better clips than "Leave a testimonial".